Posts mit dem Label Thanks werden angezeigt. Alle Posts anzeigen

MFT Stamps • Flower Fusion Card Kit • Preview

15.01.2024

Happy Monday everyone,

today we're introducing the My Favorite Things Flower Fusion Card Kit that will be available tomorrow at 10 am EST.

This beautiful kit lets you create colorful floral cards with clever stencils, a gorgeous word die and a versatile sentiment stamp set in a pretty font.

On my card, I combined the stunning Flower Fusion Stencil Set (which contains of 5 easy-to-use layering stamps) with the Smart Mask High/Low Strip Stencil.

I started off with a standard sized A2 card base made from white cardstock. I trimmed down another white cardstock panel to the same size and attached the masking stencil first. Next, I worked my way through all the several layers using Distress Oxide Inks to color the flowers (Mustard Seed, Saltwater Taffy, Abandoned Coral, Salvaged Patina, Milled Lavender, Wilted Violet) and leaves (Shabby Shutters, Mowed Lawn).

I picked a 'Thank You' sentiment from the Essential Messages stamp set and stamped it in VersaMark Ink. To match some of the flowers, I heat embossed it with Salvaged Patina Distress Embossing Glaze.

Here's a peek at the January Card Kit:

For even more ideas, product details and tutorials, please visit the MFT YouTube channel.

Thank you so much for stopping by! See you again tomorrow!
Anja

MFT Stamps • November Release Product Preview

13.11.2023

Happy new week everyone,

today we're previewing the new My Favorite Things November Release that will be available tomorrow at 10 am EST.

For my first winter themed card, I chose the adorable JB Yeti or Not stamps. These yetis are beyond cute and so much fun!

I started off with a white card base measuring standard A2. For the shimmery background I used Distress Mica Stains on a Distress Watercolor Cardstock panel. I like how it turned out because it almost looks like northern lights.

Next, I stamped the images in Extreme Black Hybrid Ink, did some Copic coloring and used the coordinating dies to cut them out. I adhered the yetis and snowy scene at the bottom half of the background. Now I stamped one of the versatile Something for Everything sentiments in VersaMark Ink onto a piece of Tropical Teal Card Stock and heat embossed it in white. I cut it out with the matching die and attached it to the card.

Make sure to visit the MFT YouTube channel for even more ideas, product details and tutorials.

Thank you so much for stopping by! See you again tomorrow!
Anja


MFT Stamps • July Release Review Day 2

13.07.2023

Hello friends,

on the 2nd day of the My Favorite Things July Release Review we're showcasing more of the new products.

On today's card, I combined the Plane and Simple Die-namics with the matching Plane and Simple Sentiments stamps and the Watercolor Rectangle Stencil.

First, I created a landscape A2 card base from white cardstock. I centered the stencil and secured it with washi tape. Then I ink blended a soft sky with Distress Oxide Inks (top: Salvaged Patina, Tumbled Glass; bottom: Saltwater Taffy, Dried Marigold) leaving a small white gap in-between the top and bottom colors.

Next, I die cut all the pieces for the plane (Smooth White, Cement Gray, Grout Gray, Ripe Raspberry, Tropical Teal, Sno Cone+Vellum, Brushed Silver) and banner (Sno Cone, Summer Splash). I assembled the plane and added a bit of shading to the wing and the banner using Copic Markers.

I stamped the sentiment in VersaMark Ink onto the banner and heat embossed it in white. Finally, I adhered the plane and banner to the card and added a small pink heart die-cut.

Make sure to visit the MFT YouTube channel for even more ideas, product details and tutorials.

Thank you so much for stopping by! Have a fantastic day!
Anja

MFT Stamps • Wednesday Sketch Challenge 631

01.02.2023

Hello sweet friends,

there's a new sketch over at the MFT Blog for our weekly Wednesday Sketch Challenge. I created a CAS card using one of the penguins from the Polar Opposites stamp set illustrated by Stacey Yacula.

I started off with a regular sized white A2 card base and trimmed down a piece of striped paper from the Finishes and Textiles Paper Pad. Next, I die cut the heart and matching frame from Summer Splash and Smooth White Card Stock using the Box of Chocolates Die-namics.

The cute penguin was stamped in Extreme Black Hybrid Ink and colored with Copics. I cut it out with the coordinating die. I stamped the sentiment in VersaMark Ink onto a black cardstock banner and heat embossed it with white embossing powder. Finally, I adhered the patterned paper and heart flat using liquid glue and popped up the penguin and sentiment banner with foam tape.

Here is this week's sketch #631:

Join the challenge with your project following the sketch for the chance to win a $50 Gift Voucher.

For even more ideas, product details and tutorials, please visit the MFT YouTube channel.

Thank you so much for stopping by! Have a great day!
Anja

MFT Stamps • September Release Day

13.09.2022

Hi everyone,

the fabulous My Favorite Things September Release is now available for purchase! Please head over to the MFT Blog for another round of inspiring DT projects.

I created this card in warm fall colors using the Crosshatch Die-namics and the Thanks Die-namics.

First, I made an A2 card base from Amarena Cherry Card Stock. For the background, I had to step out of my comfort zone working with Distress Oxide Sprays which are more difficult to control than what I usually use for ink blending. The colors I picked are Mustard Seed, Ripe Persimmon and Dusty Concord. I also added random golden paint splatters with a brush. I used the largest of the A2 Stitched Rectangle STAX Set 2 Die-namics to cut out the panel and adhered it to the card base.

Next, I die cut the crosshatch from white cardstock and carefully applied Finetec Coliro Pearlcolor in Moon Gold. The delicate 'thanks' was die cut twice from red cardstock to make it more sturdy as it is quite delicate. I added a piece of vellum behind it for more legibility.

I stamped the leaves image from the DBD Pretty Poinsettias set and the sub-sentiment (included in the Punny Farm stamp set) in VersaMark Ink onto white cardstock and heat embossed both with gold embossing powder.

For even more ideas, product details and tutorials, please visit the MFT YouTube channel.

Thank you so much for stopping by! Have fun shopping!
Anja


Sunny Studio Stamps • Thank You For Everything

14.04.2022

Hi everyone,

sadly, this will be my last post as a member of the Sunny Studio Creative Team. Today's card is dedicated to Mendi, the owner of this wonderful company. Thank you so much for having me! I had a blast designing cards with your adorable products for over 3 years.

I combined some Spring Release and previously released products for my final card. Of course I had to use one of the cute Passionate Penguins again!

I started off with a white A2 top folding card base and masked off the bottom to create an ink blended background with Distress Oxides. I mixed Cracked Pistachio and Salvaged Patina to achieve a beautiful mint color which fades downward into Tattered Rose. For the ground I blended on a bit of Pumice Stone ink.

Next, I stamped the row of houses, trees and lamp post (Charming City Stamps) as well as the penguin in Memento Tuxedo Black Ink and colored them with Copic Markers. I cut them out with the coordinating dies. The Eiffel Tower from the Paris Afternoon set was stamped in VersaMark Ink and heat embossed with Liquid Platinum embossing powder.

I cut the 'thank you' word die included in the Slimline Scalloped Frame Dies set from white cardstock and combined it with a black stamped Words of Gratitude sub sentiment. Finally, I assembled the card and added two enamel hearts in matching colors.

Thank you so much for stopping by! Have a beautiful day!
Anja

Sunny Studio Stamps • Spring Release • Out on a Limb Dies

07.04.2022

Hi everyone,

Winter has made a little comeback last weekend but that won't stop me from creating spring themed cards ;-) Today I'm featuring the Out on a Limb Dies which go perfectly with the Cherry Blossoms layering stamp set.

First, I cut and scored a white A2 landscape card base. From the right bottom corner, I started blending the Distress Oxide Inks Salvaged Patina and Tumbled Glass in circular motions. I let it fade into white and added small ink splatters with a paint brush.

I cut out a window opening from another A2 white cardstock panel using the largest of the Stitched Semi-Circle Dies. The sentiment was stamped in VersaMark Ink and heat embossed with Gold embossing powder.

Next, I die cut the tree branch and leaves from brown and green cardstock. I added a little shading with a darker tone of ink. The cherry blossoms were stamped with dye inks and I heat embossed the pistils in Gold. I used the coordinating dies to cut everything out.

I adhered the branch, leaves and blossoms to the card and finished it off with three white Pure White Jewels.

Thank you so much for stopping by! Have a wonderful day!
Anja

Sunny Studio Stamps • Spring Release • Heart Shaped Dies

20.01.2022

Hello everyone,

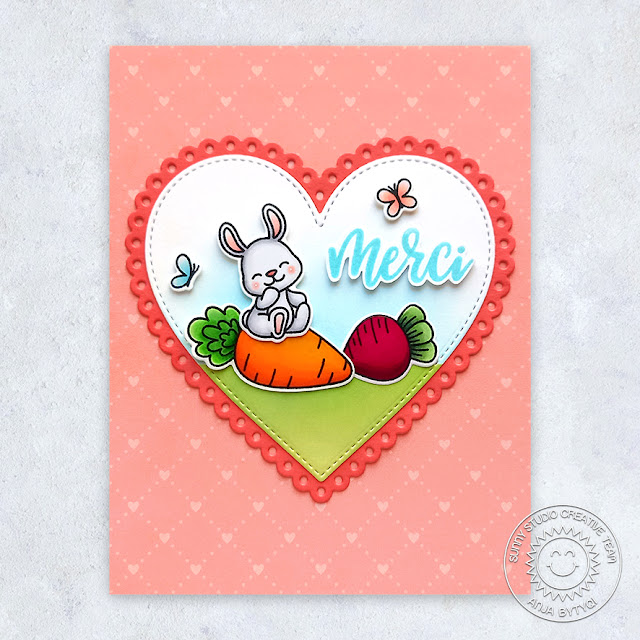
today I'm sharing a spring themed card where I used the versatile heart shaped dies from the latest release. I love that the Scalloped Heart Dies and Stitched Heart 2 Dies can be layered together.

First, I covered the card base with one of the Flirty Flowers Papers. I die cut the largest scalloped heart from coral cardstock and the stitched heart from white cardstock. To create the background for my scene, I did some masking and ink blending with Distress Oxide Inks (Tumbled Glass, Mowed Lawn, Shabby Shutters). I layered the hearts on top of each other and adhered them to the center of the card.

Next, I stamped the sweet images from the Bunnyville set in Memento Tuxedo Black Ink and colored them with Copic Markers. I used the coordinating dies to cut them out. The sentiment from the Paris Afternoon set was stamped in VersaMark Ink and heat embossed with Salvaged Patina Distress Embossing Glaze. I fussy cut it out with scissors.

Finally, I adhered the images and sentiment with foam tape. The cute bunny sitting on the carrot just makes me smile.


Thank you so much for stopping by! Have an awesome day!
Anja

Sunny Studio Stamps • Holiday Release • Words of Gratitude

30.09.2021

Hi everyone,

today's focus is on the Word of Gratitude Stamps which are perfect to simply say Thank You in many different ways.

I combined the largest of the Stitched Rectangle Dies with the Frilly Frames Chevron background and die cut it from white cardstock. I also die cut the chevrons from three colors of cardstock and alternately inlaid them. I adhered the chevron background with a piece of fun foam to the white A2 card base.

The sentiment was stamped in two colors onto a white stitched cardstock circle. I additionally heat embossed the pink words 'thank you' with clear embossing powder. Next, I die cut a couple of Winter Greenery sprigs from white cardstock and adhered them behind the sentiment circle which I popped up with foam tape. To embellish the card, I added three Iridescent Pearls in matching colors.


Thank you so much for stopping by! Have a fabulous day!
Anja

Sunny Studio Stamps • Summer Release • Teacher Appreciation

27.05.2021

Hello everyone,

the school year is coming to an end in a few weeks and I love the idea of creating Thank You cards for teachers, especially during this pandemic. The Teacher Appreciation set is full of wonderful sentiments which will work for other occasions and people as well. I combined it with the Color My World Stamps, one of the cute Beach Buddies and the gorgeous Chloe Alphabet Dies.


I started off with a light aqua A2 card base and die cut a mat from white cardstock using the stitched rectangle included in the Frilly Frames Retro Petals Die set. I stamped five colored pencils using dye inks (you can find the ink colors below) and cut them out with the coordinating die.

With the help of masking, I gave the little bunny some glasses. I used Memento Tuxedo Black Ink and did some coloring with Copic Markers. I cut him out with the matching die.

Next, I stamped the sentiment at the bottom of the card with VersaMark Ink and heat embossed it in silver. I spelled out the word 'thanks' by die cutting the individual letters from shiny rainbow mirror cardstock. I adhered them over the heat embossed sentiment and added a couple of silver paperclips below.

Finally, I popped up the colored pencils and the bunny with foam tape for a bit of dimension.

  Dye Inks used for all pencils:
Wood: MFT In the Buff and Biscotti, Altenew Caramel Toffee
Metal Piece: SSS Fog, Lawn Fawn Manatee
Eraser: Altenew Cotton Candy and Coral Berry

Pencils (Altenew Dye Inks):
Purple: Soft Lilac, Lavender Fields, Deep Iris
Pink: Pink Diamond, Pinkalicious, Rubellite
Yellow: Buttercream, Warm Sunshine, Sunkissed
Green: Bamboo, Parrot, Olive
Aqua: Dew Drop, Aqualicious, Teal Cave

Thank you so much for stopping by! Wishing you a wonderful day!
Anja

MFT 2020 Card Design Superstar • Clean & Simple Genius

20.09.2020

Hi again,

so glad I was able to get another card done for the MFT 2020 Card Design Superstar Contest 😅


Here is my card for the Clean & Simple Genius category. I love CAS designs but to be honest I find them not easy to make. I paired this sweet gnome girl from the Birdie Brown Hanging with My Gnomies set with a pretty Mother's Day Bouquet floral image.

I started off with creating a stenciled background using the Oval Extraordinaire Stencil and Distress Oxide Inks in the colors Tumbled Glass and Shaded Lilac.

Next, I stamped the images (I did the floral arch twice because it fits the oval perfectly) in Memento Tuxedo Black Ink and colored them with Copics. I cut out the flowers with the coordinating dies and did some fussy cutting for the gnome girl.

The sentiment (From the Heart set) was stamped in VersaMark Ink and I heat embossed it with Ranger Liquid Platinum embossing powder. I trimmed the stenciled panel with the second largest die of the A2 Stitched Rectangle STAX Set 2 and matted it with Coral Crush Prestige Cardstock. On my A2 card base I adhered the beautiful plaid pattern from the Spring Whimsy 6x6 Paper Pad.

Finally, I assembled my card by adhering everything with liquid glue. I made sure not to add anything else to really keep it clean and simple.

Thank you so much for stopping by! Good luck to everyone!
Anja

EverydaycraftingCo • Thank You

27.05.2020

Hi crafty friends,

a couple of weeks ago, the owner of EverydaycraftingCo reached out to me asking if I would like to play with the new background dies that can be purchased in her Etsy shop. There are 4 designs available and you can even buy a bundle at a discounted price.

I think these background dies are so versatile and give you many possibilities to create quick and eye-catching cards. For today's card, I used the Thank You background die. It's actually a 3-piece-set which comes with two individual word dies and a rectangle die.


I lined up the word dies on a white cardstock panel and ran it through my die cutting machine. I decided to put patterned paper (Sunny Studio Stamps Gingham Jewel 6x6 Paper) behind the cut out space. The large white letters stand out even more by popping up the die cut with foam tape.

Since there was a bit of room to the left and right of the word 'you', I added these two Copic colored little friends from the sweet Hello Bluebird Besties set. I really love how this clean and simple card turned out!

Thank you so much for stopping by! Have a wonderful day!
Anja

Hello Bluebird • April Release • Thank You

24.04.2020

Hello peeps,

today I want to share a CAS card with you where the adorable cow from the Party on the Farm set took center stage.


I also used the background image and single tulips from the Besties stamp set to create a little scene. I added the butterfly from the Meadow Bunnies set and colored everything with Copics. The sentiment is included in the Happy Wishes set and I heat embossed it with Ranger Liquid Platinum embossing powder.

Thank you so much for stopping by! Have a beautiful weekend!
Anja

Sunny Studio Stamps • Spring Release • Pink Peonies

19.03.2020

Hi everyone,

today I'm over on the Sunny Studio Stamps blog with a floral card highlighting the beautiful Pink Peonies Stamps.


This time I tried some no-line watercoloring with Tombow Dual Brush Pens. I stamped the images with Ink On 3 Fadeout No Line Coloring Ink and cut out some masks to create my floral cluster. I added a light grey shadow around it.

The 'thanks' sentiment is from the Sunflower Fields set. I stamped it in VersaMark Ink and heat embossed it with Ranger Liquid Platinum embossing powder. To finish off my card, I adhered some selfmade pink droplets and clear crystals.

Thank you so much for stopping by! Take care everyone!
Anja

Sunny Studio Stamps • Spring Release • Blooming Frame

05.03.2020

Hello everyone,

today I'm back with a floral Thank You card using the Sunny Studio Stamps Blooming Frame Die along with the beautiful Pink Peonies Stamps.


I started with the background by ink blending the Distress Oxides Spun Sugar, Milled Lavender and Wilted Violet onto some Bristol cardstock. I also added a couple of ink splatters with a paint brush.

Next, I die cut the Blooming Frame Die from white heavyweight cardstock using an extra metal shim in my die cutting machine due to the intricate details. I wanted to create a frame design, so I also die cut a rectangle window out of the center. I love how you can see the ink blended background behind the die-cut.

I stamped the sentiment from the Everyday Greetings set in VersaMark Ink and heat embossed it with white embossing powder. For my floral cluster, I stamped the peonies and leaves in VersaFine Onyx Black Ink and heat embossed them with clear embossing powder. This helps staying inside the lines while watercoloring. I used the coordinating dies to cut out the images and arranged them at the bottom left corner of the rectangle window. I used foam tape to pop up the peonies and tucked the leaves behind them. Finally, I adhered some matching sequins and added tiny dots of Nuvo Fairy Wings Dream Drops.


Thank you so much for stopping by! Wishing you a lovely day!
Anja

Hello Bluebird • Pumpkin Patch • Thanks

24.10.2018

Hi peeps,

today I'm back with this colorful autumn-themed card featuring products from the latest Hello Bluebird October Release. I used the fabulous Pumpkin Patch and Autumn Script stamps.

The images were colored with Copics. I chose colors that would compliment the «Woodland Forest» patterned papers by Pebbles. I used one of the My Favorite Things «Jumbo Peek-A-Boo Circle Window» Die-namics. To make the sentiment stretch around the die cut circle window, I carefully curved it before stamping it with VersaMark ink and heat embossing it in white. But this meant, I had to fussy cut the word with my scissors and craft knife ;-)

Thank you so much for stopping by!
Anja

Hello Bluebird • Autumn Leaves Thank You

23.09.2018

Happy Sunday,

Fall officially starts today and I have the matching card for you. I used the leaves dies which are included in the Gallery Frame Die #3 set.

I had a left-over piece on my desk from when I played with Nuvo Shimmer Powders lately. I thought the colors (a mix of «Catherine Wheel» and «Cherry Bomb») would be perfect for some beautiful autumn leaves. The sentiment from the Fall Friends set was heat embossed with WOW! Gold embossing powder.

To get the look of floating/falling leaves, I randomly adhered them with foam tape across the panel which I had splattered with Heidi Swapp Gold Color Shine in advance. I finished off the card by applying Nuvo «Gold Coast» Glitter Drops.

Thank you so much for stopping by! Enjoy your day!
Anja

Hello Bluebird • Fall Friends • Thanks For Everything

04.09.2018

Hello everyone,

today I'm back with another card using the adorable Fall Friends set from the Hello Bluebird August Release.

This time, I did some coloring with my new Altenew Watercolors. They are awesome and I love their vibrancy! I white heat embossed the fabulous Blowing Leaves Background on Kraft cardstock. Next, I die cut the stitched frame (Gallery Frame Die #1 set) from Aqua cardstock and adhered it to my embossed background.

The word die «thanks» is from the Gallery Frame Die #2 set and I stacked three layers (one in orange, two in black) on top of each other. I slightly shifted the orange die-cut to create a shadow. The images and panel were adhered with foam tape. I white heat embossed the sentiment on a strip of black cardstock and added some enamel dots to finish off the card.

Thank you so much for stopping by!
Anja

DT bastel-traum.ch Challenge #58

15.10.2017

Good morning everyone,

there's a new challenge theme over at the bastel-traum.ch blog – this time it's all about «Thanks».
http://bastel-traum.blogspot.ch/ 
This challenge will run until November 15th, 8:55 am CET (Central European Time).

Fall is taking a little break and it almost feels like spring where I live. So I made this floral «Thanks» card.

I stamped lots of flowers and leaves from the My Favorite Things «Pretty Posies» set with their Premium Dye Inks in shades of Coral, Aqua, Petrol and Grey. Then I cut them out using the coordinating dies.

For the background, I did some Inlaid Die Cutting to create a frame around the focal sentiment. Therefore I used the stitched scallop die from the «Blueprints 27» set and one of the «Inside & Out Stitched Rounded Rectangle STAX» Die-namics. The peachy paper is from the «Watercolor Wash» 6x6 Paper Pack.

I also die cut the large word «Thanks» («Twice the Thanks» Die-namics) from turquoise foil cardstock and inlaid it into the center piece of SU «Naturals White» cardstock. The sub sentiment comes from the «LJD Spring Wreath» set and I heat embossed it with Ranger «Liquid Platinum» embossing powder.

Finally, I arranged all the stamped images and popped up some of the flowers with foam tape for more dimension. To decorate my card, I added Pretty Pink Posh sequins («Sparkling Clear» and «Rose Gold») in different sizes.

Thank you so much for stopping by! Enjoy your Sunday!
Anja

MFT World Card Making Day 2017: ROYGBIV

08.10.2017

Hi peeps,

on the occasion of yesterday's World Card Making Day, MFT came up with some fun challenges over at their blog.


I simply LOVE rainbows! So I'm entering the ROYGBIV challenge with this Clean and Simple «Thanks» card.

At first, I blended together Distress Oxide Inks in rainbow order. When everything was completely dry, I sponged white pigment ink through the «Petal Pattern» stencil. Next, I adhered it to the center of my black card base.

To try something different, I created a 'floating' die-cut. Therefore, I partially die cut the word «thanks» from white cardstock (it's all one piece!) and popped everything up with foam tape.

Thank you so much for stopping by! Have a cozy evening!
Anja
 
site design by designer blogs