MFT Stamps • December Card Kit • Countdown Day 1

19.12.2022

Happy Monday everyone,

today we're introducing the amazing Crafty Hands Card Kit. It's jam-packed with creative dies and stamps every crafter needs! The new products will be available tomorrow at 10 am EST.

The price for this collection of coordinated products is more than 30% off the cost of buying the elements separately.

Creating and sending out cards is such a joy! For my first card I combined dies from 5 of the 6 new Die-namics sets.
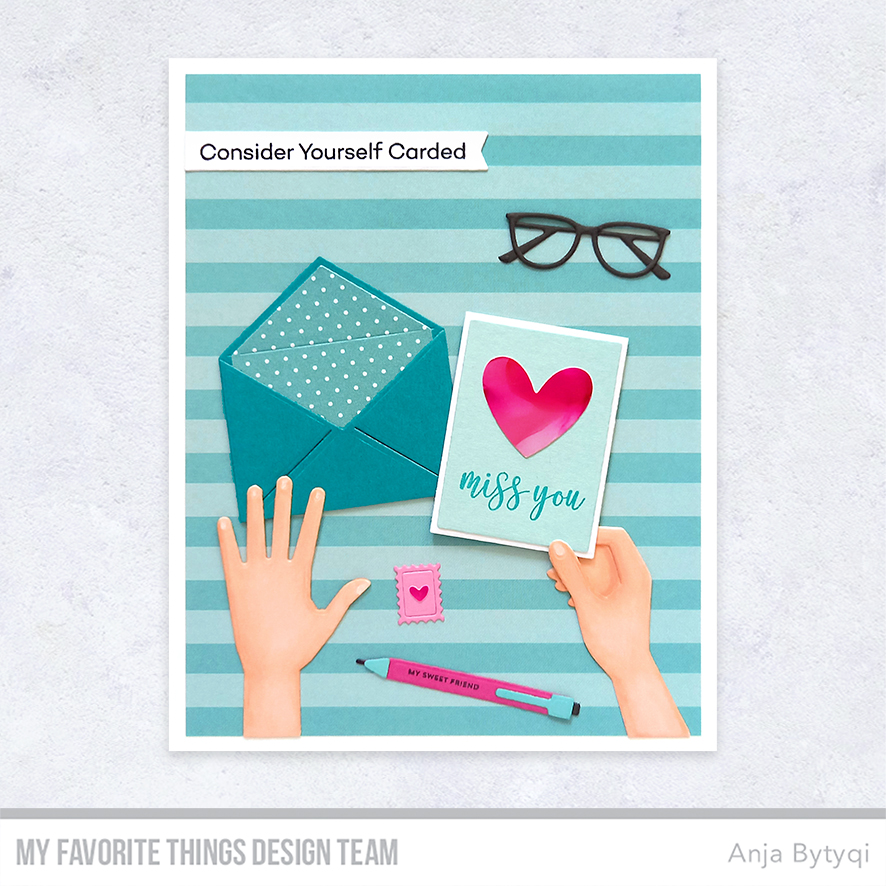
I started off with a white A2 card base and trimmed down the striped paper from the Finishes and Textiles Paper Pad to be a bit smaller. The Crafty Hands were die cut from white cardstock and I colored them with Copic markers.

Next, I die cut all the bits and pieces from cardstock and a piece of Poppin' Polka Dots Paper to create the envelope, card, postage stamp, pen and glasses. The pink hearts were cut from a left-over alcohol ink background.

I adore the Mini Messages & More stamp set that comes with a wonderful mix of favorite MFT stamps in a miniature version. I picked the 'miss you' sentiment and stamped it onto the front of the mini card. The tiny text on the pen is from the same stamp set.

The other sentiment is from the Crafty Friends stamp set which is the Free with $60 Gift option. I stamped it in black onto a white cardstock strip and used a fishtail banner die from the Blueprints 27 Die-namics set to cut it out.

I assembled the card by spreading the die-cuts across the card and adhering them with liquid glue.

Here's another peek at the December Card Kit:

Please visit the MFT YouTube channel for even more ideas, product details and tutorials.

Thank you so much for stopping by! Have a fabulous day!
Anja

MFT Stamps • December Release Day

13.12.2022

Hello friends,

the My Favorite Things December Release is now available for purchase! Due to a delivery delay I couldn't take part in the Release Countdown but I managed to make a card for today. Check out the MFT Blog to see what the Design Team created with the new products.

For my card, I picked the sweet I'll Always Chews You stamp set illustrated by Rachelle Anne Miller.

I started off with a white card base that is slightly larger than the regular A2 size. Next, I stamped the beautiful Little Leaves Background in VersaMark Ink onto a watercolor cardstock panel and heat embossed it with clear embossing powder. I then spritzed it with water and Distress Mica Stain Sprays in the colors Fresh Balsam and Wicked Elixier. When the panel was completely dry, I die cut it with the largest of the A2 Stitched Rectangle STAX Set 1 Die-namics and adhered it to the card base.

I stamped the images, colored them with Copic markers and cut them out with the coordinating dies. To make the image stand out from the busy leafy background, I die cut a circle from vellum to go behind it. The sentiment was stamped in VersaMark Ink onto a Kraft Card Stock rectangle and I heat embossed it in white. To keep the design flat, I adhered everything with liquid glue.

Make sure to check out the MFT YouTube channel for even more ideas, product details and tutorials.

Thank you so much for stopping by! Happy Shopping!
Anja

GD Sunny Studio Stamps • Penguin Party

10.12.2022

Hi everyone,

So glad to be back again as a guest designer over on the Sunny Studio Stamps Blog. Today I'm featuring the adorable Penguin Party Stamps.

On my first Christmas card, I used a couple of dies with stitching details and patterned papers from the Joyful Holiday Paper pack. I just love this happy color combo!

I started off with a white card base that is slightly larger than the standard A2 size. I cut out the patterned papers with the stitched rectangle die that is part of the Frilly Frames Quatrefoil Dies set. For the three openings I used the Window Trio Square Die. I did some ink blending in the background with Distress Oxides (Spun Sugar and Kitsch Flamingo). I trimmed the patterned papers, adhered them to the card base and added a pink cardstock strip on top where the papers meet.

Next, I stamped the penguins in Memento Tuxedo Black Ink and colored them with Copic markers. I cut them out with the coordinating dies and put each cutie inside a window opening.

To create a custom greeting I combined sentiments from the Santa Claus Lane and Merry Mice sets. I stamped them in VersaMark Ink onto a piece of green cardstock. I heat embossed it with white embossing powder and used the banner die from the Stitched Rectangle Dies set to cut it out. Finally, I adhered the banner onto the center of the pink cardstock strip.


On my second inspiration card I created a winter scene with a purple night sky. This design would work for a winter birthday card as well, right?

First, I cut and scored an A2 sized card base from white cardstock. For the purple background, I blended the Distress Oxide Inks Milled Lavender, Wilted Violet and Villainous Potion onto a lavender cardstock panel. I let it dry and added white paint splatters with a brush.

Next, I die cut two snow hills from white cardstock using one of the Slimline Nature Borders Dies. I applied Tumbled Glass Distress Oxide Ink to the edges and layered the die cuts on top of each other covering the bottom half of the card.

In addition to the penguins and accessories, I stamped the fir tree, igloo and ice block from the Winter Scenes set in Memento Tuxedo Black Ink. I colored the images with Copics again and used the coordinating dies to cut everything out.

The sentiment from the Inside Greetings Holiday set was stamped in VersaMark Ink onto a dark teal cardstock rectangle and heat embossed in white. I adhered the images and sentiment to finish off the card.

Thank you so much for stopping by! Have a wonderful weekend!
Anja

MFT Stamps • Wednesday Sketch Challenge 622

30.11.2022

Hello peeps,

I can't get enough of the Christmas Cash Kit and had to play with it again for this week's Wednesday Sketch Challenge. I also used some of the coffee themed add-ons. I just love the versatility of these products – there's no better way to gift some cash creatively.

First, I started off by cutting the Money Card Die-namics from Cream Chantilly Card Stock. I stamped the coffee stain image three times in Kraft Premium Dye Ink along the edges and added some ink splatters. The sentiment is from the Coffee Break set and I stamped it with Uncharted Mariner Distress Oxide Ink.

Next, I die cut the opening for the pouch and put the rolled money inside. I temporarily adhered another piece of cream cardstock on the back to make it easy for the recipient to take out the money.

The cup and saucer are part of the Coffee Break Companions Die-namics set and I cut it from Red Hot Card Stock. To step it up a bit, I applied Game Over Lunar Paste for some extra shine. I then cut the steam lines directly into the cream card base before adhering the die-cuts.

Although the money amount is well visible through the pouch, I added a little price sticker to the top left repeating the colors of the card (Kraft, Cornflower and Cream Chantilly).

Here is a look at sketch #622:


Join the challenge with your project following the sketch for the chance to win a $50 Gift Voucher.

For even more ideas, product details and tutorials, please visit the MFT YouTube channel.

Thank you so much for stopping by! Have a fabulous day!
Anja

MFT Stamps • November Card Kit Release Day

29.11.2022

Hi everyone,

the brilliant Christmas Cash Kit as well as an assortment of fantastic add-ons are now available for purchase.

For today's project I went with a CAS gift card holder that would be perfect for a birthday girl. Who wouldn't love to get a shopping spree to your favorite store?!

The color scheme was inspired by the lavender gift card, so the main color of my choice was Grapesicle. I combined the Money Card Die-namics with the Gift Card Pocket Die-namics. I had to do some partial die-cutting to create a wider slit to fit the gift card inside but it worked fine. I stamped one of the big Birthday Cash sentiments onto the stitched pocket with Shaded Lilac Distress Oxide Ink.

For the trio of shopping bags I used the Birthday Basics Die-namics and cut them from Poppin' Polka Dots 6x6 Paper. The bag handles were cut from matching colored cardstock (Cornflower, Boysenberry and Cotton Candy). I adhered the bags above the gift card. To finish off my project, I die cut the small heart and crown from white cardstock and sticked them to the purple bag and the gift card.

Here you can see the Christmas Cash Kit again:

Please visit the MFT YouTube channel for even more ideas, product details and tutorials.

Thank you so much for stopping by! Happy shopping!
Anja

MFT Stamps • November Card Kit • Countdown Day 1

28.11.2022

Happy Monday everyone,

the Christmas Cash Kit is so much fun to play with and today we're showing you the incredible add-ons which you can all year round. They will be available tomorrow at 10 am EST as well.

I decided to create a little coin holder card using the versatile Money Card Die-namics again. But this time, I folded the card in half and decorated it with the Tooth Fairy Die-namics and the Tooth Fairy Wishes stamp set.

I started off by die cutting the money card base from a piece of Joyful Plaid patterned paper. I also cut it a second time from white cardstock for the inside. To make folding the plaid paper easier, I cut apart the white card in half and adhered them to the back/inside. Since I planned to close the card with a ribbon, I needed to die cut a hole at the top and bottom.

Next, I die cut all the pieces for the sweet tooth that will be the focal point on the front. The crown was cut from gold glitter cardstock and the wings were done in vellum. I added some soft coloring/shading with Copic markers.

I stamped the sentiment in VersaFine Onyx Black Ink onto a Sno Cone Card Stock strip and used one of the Itty Bitty Strips Die-namics to cut it out. I adhered the tooth with liquid glue and popped up the sentiment strip and star with foam tape.

Now onto the inside: I created a small pocket to insert the coin using the stitched half circle die included in the Tag Builder Blueprints 6 Die-namics set. I cut it from the same plaid paper and adhered it with foam strips. I stamped another of the simple sentiments below it.

How perfect is the large sentiment which I stamped in blue onto the bottom half?! To finish off my little project, I pulled a piece of ribbon through the holes and tied a bow with white string.

Here's another peek at the November Card Kit:

For even more ideas, product details and tutorials, please visit the MFT YouTube channel.

Thank you so much for stopping by! See you tomorrow!
Anja

MFT Stamps • November Card Kit • Countdown Day 2

27.11.2022

Hello friends,

today we're introducing this month's amazing Christmas Cash Kit that will be available on Tuesday, November 29th at 10 am EST.

It's jam-packed with a great mix of unique products to present some cash or gift cards in a creative way. The possibilities to personalize them are endless!

I made this fun project using the Money Card Die-namics, the Christmas Cash and Price Tag stamps as well as one of the included pouches to house the money.

First, I cut the A2-sized rounded rectangle die from white cardstock and patterned paper from the Colorful Christmas Paper Pad. Onto a strip of Blue Beyond Card Stock I stamped one of the smaller sentiments in VersaMark Ink and heat embossed it in white. I used a die (that matches the rounded corners of the card base perfectly) to cut it out and adhered it to the top.

Next, I stamped the large 'Naughty or Nice' sentiment in VersaFine Onyx Black Ink onto a white cardstock panel. I also added the check mark to the second square. I trimmed the panel and used one of the Torn Paper Edges Die-namics at the bottom.

I rolled the money and carefully put it inside the pouch which I adhered with double-sided adhesive tape. For a more finished look, I added a frame around it. I love that you have all the dies in the Money Card Die-namics set included to easily dress up your project. The amount was stamped onto a Sour Apple Card Stock circle which I adhered on top of a Field Day Card Stock sunburst circle. 

Of course, there had to be a santa on my card, too. I used a cute YUZU Holly Jolly Santa image which I colored with Copics. I cut it out with the matching die and popped it up with thin foam squares. Finally, I added a blue die cut star to balance out the design.

Here's a peek at the November Card Kit:

Make sure to check out the MFT YouTube channel for even more ideas, product details and tutorials.

I will see you again tomorrow where we're showing you some fabulous add ons!

Thank you so much for stopping by! Have a wonderful Sunday!
Anja

 
site design by designer blogs