MFT Stamps • January Release Countdown Day 2

15.01.2023

Hello everyone,

only 2 more days until the My Favorite Things January Release goes live. Check out today's product reveals and lovely DT inspiration over on the MFT Blog.

I created a CAS card with the adorable Sweetheart stamp set illustrated by Tiddly Inks.

I started off with a white A2 card base and a panel in the same size. I did some ink blending with Distress Oxides (Tattered Rose and Dried Marigold) to create an oval soft background. I added some pearly paint splatters with a small brush and let it dry completely. At the bottom, I stamped one of the sentiments in VersaMark Ink and heat embossed it in Silver. Then I adhered the panel to the card base with liquid glue.

Next, I stamped the image in Extreme Black Hybrid Ink and colored it with Copic markers. I used the coordinating die to cut the girl out and popped her up with foam tape.

For even more ideas, product details and tutorials, please visit the MFT YouTube channel.

Thank you so much for stopping by! Wishing you a relaxed Sunday!
Anja

MFT Stamps • January Release Countdown Day 3

14.01.2023

Hi peeps,

we are halfway to the My Favorite Things January Release Day and we have so many more lovable products to share.

Today, I'm featuring the cute YUZU Hunny Bunny stamp set and used the Cloud Stencil to create a soft background.

First, I cut and scored an A2 card base from white cardstock. I trimmed down another panel to be slightly smaller and applied Tumbled Glass Distress Oxide Ink through the stencil covering the whole background with clouds.

Next, I stamped the images in Extreme Black Hybrid Ink and colored them with Copics. I cut everything out with the coordinating dies.

The sentiment was stamped in VersaMark Ink onto two Grapesicle Card Stock stripes and I did some heat embossing in white. To finish off the card, I adhered the images and sentiment strips with liquid glue.

I invite you to visit the MFT YouTube channel for even more ideas, product details and tutorials.

Thank you so much for stopping by! Have a great weekend!
Anja

MFT Stamps • January Release Countdown Day 4

13.01.2023

Hello everyone,

it's Countdown Day 4 for the My Favorite Things January Release and today we've got some sweet Valentine's Day products to share.

What better than some yummy treats in a heart-shaped box embellished with a pretty bow, right? The Box of Chocolates Die-namics are the perfect Valentine!

I started off with an A2 sized card base made from Sno Cone Card Stock. I used the Lots of Heart Stencil along with Summer Splash Premium Dye Ink to create a subtle background that fades to the edges.

Next, I die cut the box, bow, chocolates, toppers and wrappers from the cardstock colors Princess Pink, Cotton Candy, Ripe Raspberry, Chantilly Cream and Milk Chocolate. To make the lid see-through, I die cut a heart from acetate. The paper heart behind the chocolates was stamped with the X's and O's Background.

I stamped one of the Sweet Nothings sentiments in VersaMark Ink onto a Cotton Candy Card Stock strip which I adhered at the bottom of the card. The lid and box were attached at an opposite angle and overlap each other.

Make sure to check out the MFT YouTube channel for even more ideas, product details and tutorials.

Thank you so much for stopping by! See you tomorrow!
Anja

MFT Stamps • January Release Countdown Day 5

12.01.2023

Hi crafty friends,

so excited to be back again as we are kicking off the My Favorite Things January Release Countdown. The new products will be available on Tuesday, January 17th at 10 am EST.

My first card for 2023 features the awesome Typewriter Die-namics as well as the Typewriter Sentiments: Friendship stamps. Of course I had to do the typewriter in my favorite color ;-)

First, I created a standard A2 sized card base from white cardstock. I trimmed down one of the Poppin' Polka Dot papers and adhered it to the card base.

Next, I die cut all the pieces for the typewriter (Card Stock colors used: Summer Splash, Cement Gray, Gravel Gray, Black Licorice, Smooth White) and assembled it. Before inserting the white paper, I stamped the sentiment in VersaFine Onyx Black Ink and added a tiny red heart from the Itty Bitty Love Notes set.

To complete my simple design, I also die cut the glasses (Creature Comfort Die-namics) and postage stamp (Paper Goods Die-namics). Finally, I adhered the die-cuts with liquid glue.

Please visit the MFT YouTube channel for even more ideas, product details and tutorials.

Thank you so much for stopping by! Have an amazing day!
Anja

MFT Stamps • December Card Kit • Countdown Day 1

19.12.2022

Happy Monday everyone,

today we're introducing the amazing Crafty Hands Card Kit. It's jam-packed with creative dies and stamps every crafter needs! The new products will be available tomorrow at 10 am EST.

The price for this collection of coordinated products is more than 30% off the cost of buying the elements separately.

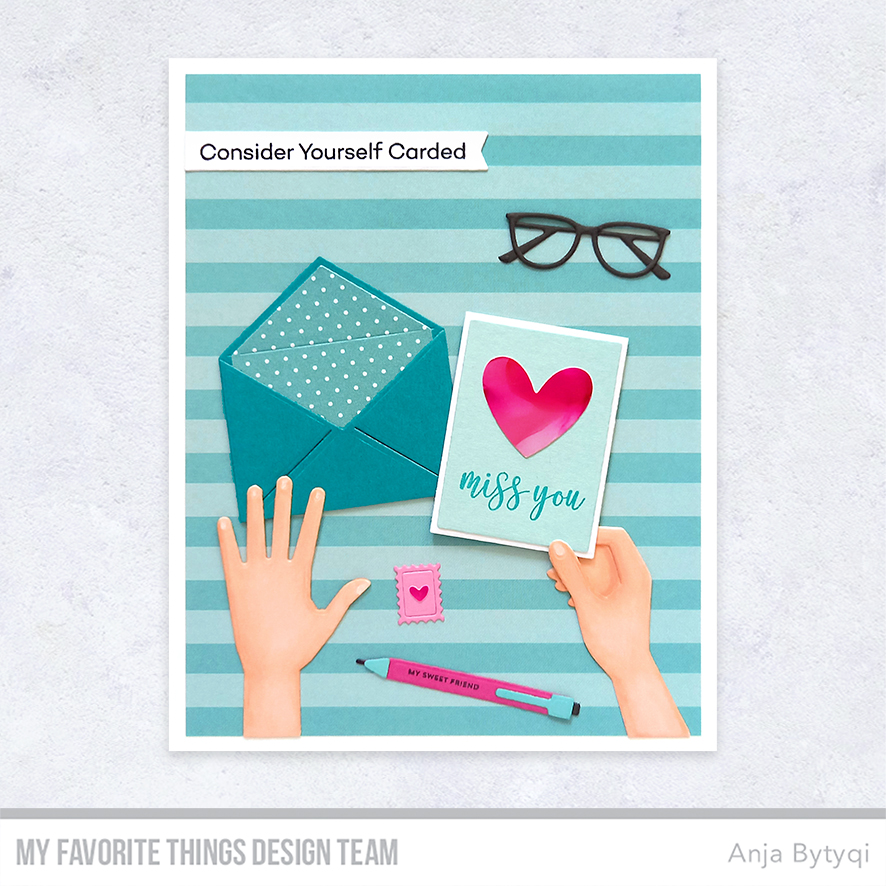
Creating and sending out cards is such a joy! For my first card I combined dies from 5 of the 6 new Die-namics sets.

I started off with a white A2 card base and trimmed down the striped paper from the Finishes and Textiles Paper Pad to be a bit smaller. The Crafty Hands were die cut from white cardstock and I colored them with Copic markers.

Next, I die cut all the bits and pieces from cardstock and a piece of Poppin' Polka Dots Paper to create the envelope, card, postage stamp, pen and glasses. The pink hearts were cut from a left-over alcohol ink background.

I adore the Mini Messages & More stamp set that comes with a wonderful mix of favorite MFT stamps in a miniature version. I picked the 'miss you' sentiment and stamped it onto the front of the mini card. The tiny text on the pen is from the same stamp set.

The other sentiment is from the Crafty Friends stamp set which is the Free with $60 Gift option. I stamped it in black onto a white cardstock strip and used a fishtail banner die from the Blueprints 27 Die-namics set to cut it out.

I assembled the card by spreading the die-cuts across the card and adhering them with liquid glue.

Here's another peek at the December Card Kit:

Please visit the MFT YouTube channel for even more ideas, product details and tutorials.

Thank you so much for stopping by! Have a fabulous day!
Anja

MFT Stamps • December Release Day

13.12.2022

Hello friends,

the My Favorite Things December Release is now available for purchase! Due to a delivery delay I couldn't take part in the Release Countdown but I managed to make a card for today. Check out the MFT Blog to see what the Design Team created with the new products.

For my card, I picked the sweet I'll Always Chews You stamp set illustrated by Rachelle Anne Miller.

I started off with a white card base that is slightly larger than the regular A2 size. Next, I stamped the beautiful Little Leaves Background in VersaMark Ink onto a watercolor cardstock panel and heat embossed it with clear embossing powder. I then spritzed it with water and Distress Mica Stain Sprays in the colors Fresh Balsam and Wicked Elixier. When the panel was completely dry, I die cut it with the largest of the A2 Stitched Rectangle STAX Set 1 Die-namics and adhered it to the card base.

I stamped the images, colored them with Copic markers and cut them out with the coordinating dies. To make the image stand out from the busy leafy background, I die cut a circle from vellum to go behind it. The sentiment was stamped in VersaMark Ink onto a Kraft Card Stock rectangle and I heat embossed it in white. To keep the design flat, I adhered everything with liquid glue.

Make sure to check out the MFT YouTube channel for even more ideas, product details and tutorials.

Thank you so much for stopping by! Happy Shopping!
Anja

GD Sunny Studio Stamps • Penguin Party

10.12.2022

Hi everyone,

So glad to be back again as a guest designer over on the Sunny Studio Stamps Blog. Today I'm featuring the adorable Penguin Party Stamps.

On my first Christmas card, I used a couple of dies with stitching details and patterned papers from the Joyful Holiday Paper pack. I just love this happy color combo!

I started off with a white card base that is slightly larger than the standard A2 size. I cut out the patterned papers with the stitched rectangle die that is part of the Frilly Frames Quatrefoil Dies set. For the three openings I used the Window Trio Square Die. I did some ink blending in the background with Distress Oxides (Spun Sugar and Kitsch Flamingo). I trimmed the patterned papers, adhered them to the card base and added a pink cardstock strip on top where the papers meet.

Next, I stamped the penguins in Memento Tuxedo Black Ink and colored them with Copic markers. I cut them out with the coordinating dies and put each cutie inside a window opening.

To create a custom greeting I combined sentiments from the Santa Claus Lane and Merry Mice sets. I stamped them in VersaMark Ink onto a piece of green cardstock. I heat embossed it with white embossing powder and used the banner die from the Stitched Rectangle Dies set to cut it out. Finally, I adhered the banner onto the center of the pink cardstock strip.


On my second inspiration card I created a winter scene with a purple night sky. This design would work for a winter birthday card as well, right?

First, I cut and scored an A2 sized card base from white cardstock. For the purple background, I blended the Distress Oxide Inks Milled Lavender, Wilted Violet and Villainous Potion onto a lavender cardstock panel. I let it dry and added white paint splatters with a brush.

Next, I die cut two snow hills from white cardstock using one of the Slimline Nature Borders Dies. I applied Tumbled Glass Distress Oxide Ink to the edges and layered the die cuts on top of each other covering the bottom half of the card.

In addition to the penguins and accessories, I stamped the fir tree, igloo and ice block from the Winter Scenes set in Memento Tuxedo Black Ink. I colored the images with Copics again and used the coordinating dies to cut everything out.

The sentiment from the Inside Greetings Holiday set was stamped in VersaMark Ink onto a dark teal cardstock rectangle and heat embossed in white. I adhered the images and sentiment to finish off the card.

Thank you so much for stopping by! Have a wonderful weekend!
Anja

 
site design by designer blogs