Posts mit dem Label Sunny Studio Stamps werden angezeigt. Alle Posts anzeigen

GD Sunny Studio Stamps • Penguin Party

10.12.2022

Hi everyone,

So glad to be back again as a guest designer over on the Sunny Studio Stamps Blog. Today I'm featuring the adorable Penguin Party Stamps.

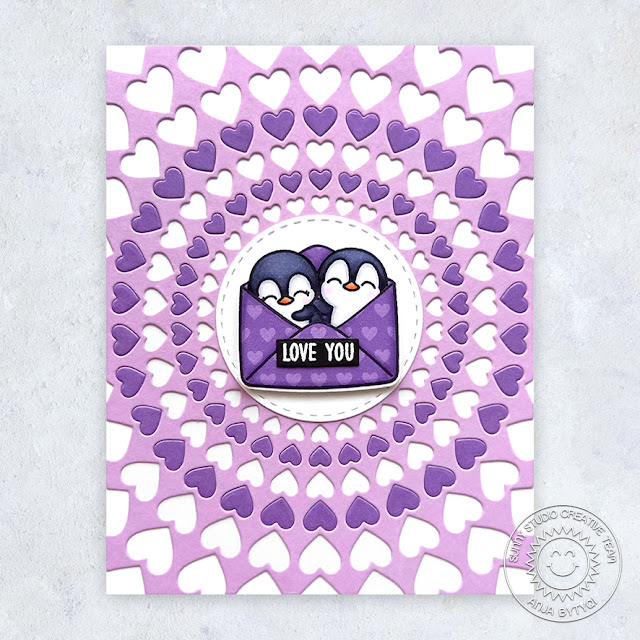
On my first Christmas card, I used a couple of dies with stitching details and patterned papers from the Joyful Holiday Paper pack. I just love this happy color combo!

I started off with a white card base that is slightly larger than the standard A2 size. I cut out the patterned papers with the stitched rectangle die that is part of the Frilly Frames Quatrefoil Dies set. For the three openings I used the Window Trio Square Die. I did some ink blending in the background with Distress Oxides (Spun Sugar and Kitsch Flamingo). I trimmed the patterned papers, adhered them to the card base and added a pink cardstock strip on top where the papers meet.

Next, I stamped the penguins in Memento Tuxedo Black Ink and colored them with Copic markers. I cut them out with the coordinating dies and put each cutie inside a window opening.

To create a custom greeting I combined sentiments from the Santa Claus Lane and Merry Mice sets. I stamped them in VersaMark Ink onto a piece of green cardstock. I heat embossed it with white embossing powder and used the banner die from the Stitched Rectangle Dies set to cut it out. Finally, I adhered the banner onto the center of the pink cardstock strip.


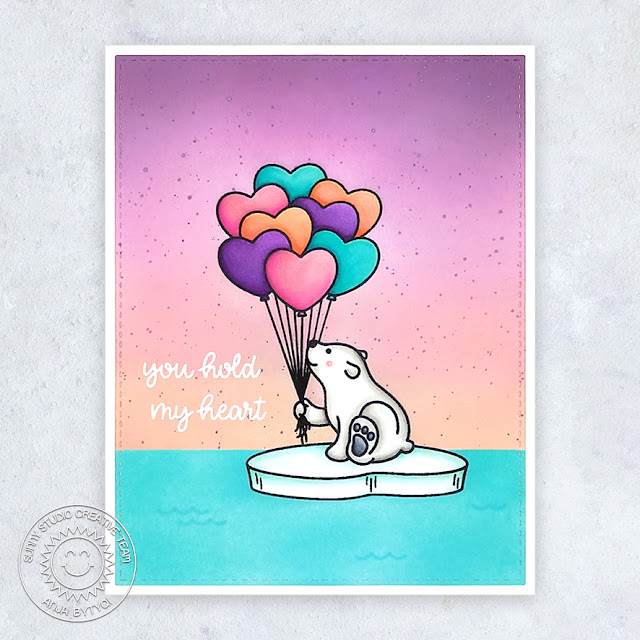
On my second inspiration card I created a winter scene with a purple night sky. This design would work for a winter birthday card as well, right?

First, I cut and scored an A2 sized card base from white cardstock. For the purple background, I blended the Distress Oxide Inks Milled Lavender, Wilted Violet and Villainous Potion onto a lavender cardstock panel. I let it dry and added white paint splatters with a brush.

Next, I die cut two snow hills from white cardstock using one of the Slimline Nature Borders Dies. I applied Tumbled Glass Distress Oxide Ink to the edges and layered the die cuts on top of each other covering the bottom half of the card.

In addition to the penguins and accessories, I stamped the fir tree, igloo and ice block from the Winter Scenes set in Memento Tuxedo Black Ink. I colored the images with Copics again and used the coordinating dies to cut everything out.

The sentiment from the Inside Greetings Holiday set was stamped in VersaMark Ink onto a dark teal cardstock rectangle and heat embossed in white. I adhered the images and sentiment to finish off the card.

Thank you so much for stopping by! Have a wonderful weekend!
Anja

GD Sunny Studio Stamps • Cozy Christmas

29.10.2022

Hi everyone,

I'm so happy to be back again as a guest over on the Sunny Studio Stamps Blog. Today I'm showcasing the wonderful Cozy Christmas Stamps from the latest Holiday Release.

On my first sample, I used the stamps for a non-holiday card and created a sweet little living room scene.

First, I started off with a white A2 card base and die cut the largest of the Stitched Rectangle Dies from light blue cardstock. In the next step, I die cut the stitched scalloped mat from the Mini Mat & Tag 3 Dies set out of white cardstock. I masked off the scallop border as well as the stitching and did some ink blending with Distress Oxide Inks. For the wall background, I blended on Tattered Rose and a little bit of Saltwater Taffy. The floor was done in Pumice Stone. I let it dry completely and stamped one of the Penguin Party sentiments in VersaMark Ink. I heat embossed it with Ranger Platinum Embossing Powder. For a bit of dimension, I popped up the scalloped mat with foam tape.

Next, I stamped the images in Memento Tuxedo Black Ink and colored them with Copic markers. I used the coordinating dies to cut everything out. On the armchair, I did some Paper Piecing with blue gingham paper from the Joyful Holiday Paper Pack. I also created a little rug from a piece of Flirty Flowers patterned paper.

Finally, I assembled the scene by adhering the images and floral rug with liquid glue and adding a red enamel heart next to the heat embossed sentiment.


The second sample had to be a holiday card and I really wanted to use the comfy sofa.

I created a landscape A2 card base from white cardstock and covered the front with a striped Joyful Holiday paper. I cut the largest of the Stitched Oval 2 Dies from white cardstock. I also used it on a piece of woodgrain patterned paper (Subtle Grey Tones Paper Pack) and a thin white cardstock strip. In  the background, I did some faded ink blending with Tumbled Glass and Salvaged Patina Distress Oxide Ink. Then, I adhered the woodgrain floor and white strip to the bottom half of the oval. I stamped the sentiment on top using aqua blue pigment ink.

The images were stamped in Memento Tuxedo Black Ink and colored with Copic markers. I paper pieced the pillows and cut everything out with the coordinating dies.

I adhered the images to finish off the scene and applied some Crystal Stickles to the white parts of the christmas tree decor.

Thank you so much for stopping by! Have a cozy weekend!
Anja

GD Sunny Studio Stamps • Baby Elephants

13.08.2022

Hi everyone,

I'm so honored to be back again as a guest over on the Sunny Studio Stamps Blog. Today I'm featuring the absolutely adorable Baby Elephants Stamps.

For my first card, I created a summer scene by combining two of the elephants with the Tropical Trees Backdrop Die.

First, I created an A2 landscape card base from white heavyweight cardstock. I then die cut all the pieces for my beach scene and started on working on the background. I masked off the bottom to create a horizont and stenciled the clouds with Saltwater Taffy Distress Oxide Ink. The gradient ink blending for the water was done with Peacock Feathers, Salvaged Patina and Tumbled Glass Distress Oxide Ink.

Next, I colored the sand (Antique Linen, Frayed Burlap) and palm trees (Mowed Lawn, Rustic Wilderness, Frayed Burlap, Gathered Twigs, Black Soot) with Distress Oxide Inks as well. The sea gulls were die cut from light grey cardstock.

I stamped the elephants in Memento Tuxedo Black Ink and colored them with Copic Markers. I cut them out with the coordinating Baby Elephants Dies. The sentiment (Inside Greetings Birthday Stamps) was stamped in VersaMark Ink onto a turquoise cardstock strip and heat embossed in white.

Finally, I assembled the scene by adhering the die cuts and images. I layered two of the white stitched frames on top of each other for a bit of dimension.


Of course, I also had to make a Baby card with the sweet elephant sleeping in the clouds.

I started off with a lilac A2 card base and picked the purple starry patterned paper from the Surprise Party 6x6 Paper Pack. I die cut it with the full-size A2 stitched rectangle die from the Frilly Frames Quatrefoil Dies set. To create a window opening, I used the second largest of the Stitched Semi-Circle Dies.

For the purple night sky background, I did some circular ink blending with Distress Oxide Inks (Villainous Potion, Wilted Violet and Milled Lavender). I used the cloudy border from the Slimline Nature Borders Dies set and cut it from white cardstock. I added Tumbled Glass Distress Oxide Ink to the top edge.

Next, I stamped the images in Memento Tuxedo Black Ink and colored them with Copic Markers. I cut them out with their matching dies. I arranged and glued down everything behind the semi-circle window and popped up the starry patterned paper panel with foam tape.

The sentiment was stamped in VersaMark Ink onto a black cardstock fishtail banner and I heat embossed it with white embossing powder. I adhered it below the elphant image to finish off my card.

Thank you so much for stopping by! Have an amazing weekend!
Anja

GD Sunny Studio Stamps • Kiddie Pool

02.07.2022

Hello everyone,

so happy to be back again guest designing for Sunny Studio Stamps. This time I'm sharing two cards made with the Kiddie Pool Stamps from the Summer Release. I love how well these stamps work with other products! 

For my first card, I created a colorful scene using the inflatable swimming pool along with two of the kids who are having some splashy summer fun in the garden.

First, I started off with ink blending the faded sky background onto a white A2 panel. I used Tumbled Glass and Salvaged Patina Distress Oxide Ink. To create a bit of texture, I splattered on Peacock Feathers Distress Oxide Ink as well as white gouache paint. When everything was completely dry, I stamped the big scripty word 'Summer' from the Radiant Plumeria stamp set in VersaMark Ink and heat embossed it with bright pink embossing powder. The sub sentiment was stamped underneath in VersaFine Onyx Black Ink.

I trimmed down a green dotted paper from the Heroic Halftones 6x6 Paper Pack. At the top, I used the grassy border from the Picket Fence Die set. I adhered the grass panel flat to the background.

Next, I picked a couple of summer accessories from the Beach Buddies (sun hat, beach bag, rolled towels and suncream) and the Beach Babies (beach ball) set. I stamped all the images in Memento Tuxedo Black Ink and colored them with Copic Markers. I cut them out with the coordinating dies and adhered everything with liquid glue and foam tape. To finish off the card, I added some water droplet images next to the girl which has been tucked into the water.


On my second card, I used the Swimming Pool Die in addition to the stamps to create another summer scene.

I created an A2 landscape card base from Naturals White cardstock which has lots of small brown speckles. I die cut the swimming pool from white and grey cardstock (railing). I did the outer piece twice, colored the top one with Copics and then stacked the die cuts together. The water was inked with Tumbled Glass and Salvaged Patina Distress Oxide Ink. I let it dry and inlaid it back into the tiled piece.

Once again, I used some accessory images from the sets mentioned above to complete my pool scene. I stamped them in Memento Tuxedo Black Ink and did some Copic coloring. Everything was cut out with the matching dies and adhered with liquid glue or foam tape.

The sentiment is from the Sealiously Sweet set and I stamped it in VersaMark Ink onto a black cardstock strip. I heat embossed it with white embossing powder and adhered the strip at the top of the card.

Thank you so much for stopping by! Wishing you a fun summer time!
Anja

GD Sunny Studio Stamps • Country Carnival

04.06.2022

Hi everyone,

today I'm excited to be guest designing for Sunny Studio Stamps. I'm sharing two cards made with the Country Carnival Stamps from the latest Summer Release.

On my first card, I created a fun carnival scene using the carousel, ticket booth, popcorn stand, balloons and bear images.

I started off with ink blending the background. To create a cotton candy colored sky, I used the Distress Oxide Inks Salvaged Patina, Kitsch Flamingo and Spun Sugar. The ground was blended with Hickory Smoke ink. I die cut it with the stitched rectangle die from the Frilly Frames Retro Petals set. I stamped the sentiment in VersaFine Onyx Black Ink and adhered the background to the white A2 card base.

Next, I stamped the images in Memento Tuxedo Black Ink and colored them with Copic Markers. I cut them out with the coordinating dies and adhered everything with liquid glue.


For my second card, I used the awesome ferris wheel and combined it with a couple of other images.

This time I created a portrait A2 card base from white cardstock and blended on some Salvaged Patina and Tumbled Glass Distress Oxide Ink in the background. For the two grass hills, I used Mowed Lawn and Shabby Shutters and die cut them with the Slimline Nature Border Dies.

I picked the girl and boy from the Spring Showers set as well as the small trees included in the Balloon Rides set. The images were stamped in Memento Tuxedo Black Ink and I colored them with Copic Markers. I cut everything out with the coordinating dies.

I stamped the sentiment in VersaMark Ink onto a black cardstock strip and heat embossed it with white embossing powder. I also added the word 'FUN' which I die cut from colored and white cardstock using the Chloe Alphabet Dies. Finally, I assembled the scene by adhering the die cuts, sentiment and images.

Thank you so much for stopping by! Hope you have an amazing day!
Anja

Sunny Studio Stamps • Thank You For Everything

14.04.2022

Hi everyone,

sadly, this will be my last post as a member of the Sunny Studio Creative Team. Today's card is dedicated to Mendi, the owner of this wonderful company. Thank you so much for having me! I had a blast designing cards with your adorable products for over 3 years.

I combined some Spring Release and previously released products for my final card. Of course I had to use one of the cute Passionate Penguins again!

I started off with a white A2 top folding card base and masked off the bottom to create an ink blended background with Distress Oxides. I mixed Cracked Pistachio and Salvaged Patina to achieve a beautiful mint color which fades downward into Tattered Rose. For the ground I blended on a bit of Pumice Stone ink.

Next, I stamped the row of houses, trees and lamp post (Charming City Stamps) as well as the penguin in Memento Tuxedo Black Ink and colored them with Copic Markers. I cut them out with the coordinating dies. The Eiffel Tower from the Paris Afternoon set was stamped in VersaMark Ink and heat embossed with Liquid Platinum embossing powder.

I cut the 'thank you' word die included in the Slimline Scalloped Frame Dies set from white cardstock and combined it with a black stamped Words of Gratitude sub sentiment. Finally, I assembled the card and added two enamel hearts in matching colors.

Thank you so much for stopping by! Have a beautiful day!
Anja

Sunny Studio Stamps • Spring Release • Out on a Limb Dies

07.04.2022

Hi everyone,

Winter has made a little comeback last weekend but that won't stop me from creating spring themed cards ;-) Today I'm featuring the Out on a Limb Dies which go perfectly with the Cherry Blossoms layering stamp set.

First, I cut and scored a white A2 landscape card base. From the right bottom corner, I started blending the Distress Oxide Inks Salvaged Patina and Tumbled Glass in circular motions. I let it fade into white and added small ink splatters with a paint brush.

I cut out a window opening from another A2 white cardstock panel using the largest of the Stitched Semi-Circle Dies. The sentiment was stamped in VersaMark Ink and heat embossed with Gold embossing powder.

Next, I die cut the tree branch and leaves from brown and green cardstock. I added a little shading with a darker tone of ink. The cherry blossoms were stamped with dye inks and I heat embossed the pistils in Gold. I used the coordinating dies to cut everything out.

I adhered the branch, leaves and blossoms to the card and finished it off with three white Pure White Jewels.

Thank you so much for stopping by! Have a wonderful day!
Anja

Sunny Studio Stamps • Spring Release • Spring Greenery Dies

31.03.2022

Hello everyone,

today's Clean and Simple card features the versatile Spring Greenery Dies. I chose the veined leaves and die cut them from cardstock in rainbow colors.

I let the leaves float across the left side of the white A2 card base and added one of the scripty Lovey Dovey sentiments to the right. It was stamped in VersaMark Ink and heat embossed with Platinum embossing powder. After cutting it out with the coordinating die, I adhered it with small slivers of foam tape. Finally, I embellished the card with matching glitter enamel dots.

Thank you so much for stopping by! Have an amazing day!
Anja

Sunny Studio Stamps • Spring Release • Bunnyville

24.03.2022

Hi everyone,

today I'm sharing a sweet spring scene created with the adorable Bunnyville Stamps.

I started off with a lilac top folding A2 card base and trimmed down a piece of Bristol cardstock to be a bit smaller. For the background, I blended together the Distress Oxide Inks Tumbled Glass, Salvaged Patina, Mowed Lawn and Twisted Citron. I let the colors fade into the white and added ink splatters with a paint brush. When everything was completely dry, I stamped the sentiment from the Spring Greetings mini set in VersaMark Ink and heat embossed it with Silver embossing powder.

Next, I stamped the images in Memento Tuxedo Black Ink and colored them with Copic Markers. I just love these cute bunnies and their little carrot house. I cut everything out with the coordinating dies and assembled the scene.

Thank you so much for stopping by! Have a beautiful day!
Anja

Sunny Studio Stamps • Spring Release • Little Birdie

17.03.2022

Hello everyone,

today I'm sharing a spring themed Birthday card made with the adorable Little Birdie Stamps.

I started off with a white A2 card base and picked the cloudy design from the Summer Splash 6x6 Paper pack to be my background. I trimmed it to 3" width and matted it with dark purple cardstock.

Next, I stamped the images in Memento Tuxedo Black Ink and colored them with Copic Markers. I used the coordinating dies to cut everything out. I adhered the images with liquid glue and drew in the string for the birdhouse with a thin black Copic Multiliner.

The birthday sentiment was stamped in VersaMark Ink onto a black cardstock strip and I heat embossed it with white embossing powder.

Thank you so much for stopping by! Wishing you a day full of sunshine!
Anja

Sunny Studio Stamps • Spring Release • Paris Afternoon

24.02.2022

Hi everyone,

I'm already looking forward to spring! So I created a scene with the Paris Afternoon Stamps. Sweet "Madame Poodle" is dreaming of a picnic at the park.

First, I used the Frilly Frames Quatrefoil stitched rectangle die to cut out a full-size A2 mat from the Subtle Grey Tones sunburst paper. I adhered it to a top folding landscape card base.

For my pastel background, I did some ink blending with Distress Oxides (Tumbled Glass, Shaded Lilac, Milled Lavender and Spun Sugar) onto a piece of Bristol cardstock. I stamped the arch image from the Charming City set in VersaMark Ink and heat embossed it with Salvaged Patina Distress Embossing Glaze

On another Bristol cardstock strip, I blended together Bundled Sage and Rustic Wilderness Distress Oxide Ink for the grass. At the top I used the the grass border die included in the Comic Strip Everyday Dies set. I die cut both ink blended pieces with the largest of the Stitched Semi-Circle Dies and layered the grass border over the background.

Next, I stamped the images (the trees are from Charming City and Critters on the Go) in Memento Tuxedo Black Ink and colored them with Copic Markers. I used the coordinating dies to cut everything out. The word 'bonjour' was stamped in VersaMark Ink and heat embossed with silver embossing powder. Since there isn't a matching die, I carefully fussy cut it with scissors.

Finally, I assembled my scene by adhering the images and popping up the sentiment and poodle with foam tape.

Thank you so much for stopping by! Hope you're having a beautiful day!
Anja


Sunny Studio Stamps • Spring Release • Critters on the Go

17.02.2022

Hello everyone,

today I'm back with a fun card featuring the Critters on the Go Stamps. I especially like the dogs on their skateboards!


I started off with an A2 landscape card base and created a scene using the Slimline Nature Border Dies which I cut from several cardstocks. I also added stitched cloud shapes to the light blue sky with the Fluffy Clouds Dies.

Next, I stamped the images in Memento Tuxedo Black Ink and colored them with Copic Markers. I used the coordinating dies to cut everything out.

For my greeting, I cut the Hello Word Die from shiny holographic cardstock and stamped the sentiment from the Happy Hamsters set with turquoise pigment ink. I adhered the die cuts and images with liquid glue and finished off the card with three red hearts placed around the sentiment.

Thank you so much for stopping by! Have a wheelie great day!
Anja

Sunny Studio Stamps • Spring Release • Quilted Hearts Die

10.02.2022

Hi everyone,

Valentine's Day is just around the corner! So I created a love themed card highlighting the Quilted Hearts Portrait Die.

First, I made a regular A2 card base from white cardstock. I did some ink blending on another white cardstock panel using Distress Oxide Inks (Picked Raspberry, Kitsch Flamingo, Worn Lipstick, Spun Sugar andTattered Rose). For some texture, I randomly splattered on water droplets and lifted off the color with a paper towel. I let it dry before running it through my diecutting machine with the Quilted Hearts Portrait Die.

Next, I stamped two birds and the tree branch from the Little Birdie set in Memento Tuxedo Black Ink and colored them with Copic Markers. I used the coordinating dies to cut out the images which I then adhered with foam tape.

The big scripty sentiment from the Lovey Dovey set was stamped in VersaMark Ink onto a piece of white cardstock. I heat embossed it with WOW! Metallic Brass Sparkle Embossing Glitter. I really like that there are coordinating dies to cut out the sentiments for a finished look. Finally, I popped up with foam tape as well.


Thank you so much for stopping by! Have a lovely day!
Anja

Sunny Studio Stamps • Spring Release • Passionate Penguins

03.02.2022

Hello everyone,

today I'm featuring the adorable Passionate Penguins Stamps – they are definitely one of my favorites! I just love their sweet little faces! I created a love themed CAS card in berry pink tones.

I started off with a square card base measuring 4.25" x 4.25". Next, I die cut two of the Stitched Heart 2 Dies from pink cardstocks and layered them on top of each other.

The penguins and tea cup were stamped in Memento Tuxedo Black Ink and colored with Copic Markers. I used the coordinating dies to cut them out. It's so cute how they are sitting inside the cup.

I stamped the sentiment in VersaMark Ink onto a black cardstock strip and heat embossed it with white embossing powder. Finally, I adhered the images and sentiment strip with foam tape.

Thank you so much for stopping by! Enjoy a wonderful day!
Anja

Sunny Studio Stamps • Spring Release • Bursting Hearts Die

27.01.2022

Hi everyone,

I'm back with another love themed card using the Bursting Hearts Die. There's so much you can do with this wonderful A2 sized backdrop. I decided to create a monochromatic card with a cute Passionate Penguins couple in the center.


First, I die cut the backdrop from lavender and purple cardstock. I adhered the lavender panel to a white card base using liquid glue. Next, I inlaid some of the purple heart die-cuts into two of the circular rows. and covered the center with a white stitched circle.

I stamped the image in Memento Tuxedo Black Ink and colored the penguins with Copic Markers. I used the coordinating die to cut out the image. I paper pieced the envelope by stamping the image again onto a piece of patterned paper from the Rainbow Bright Paper pack. I fussy cut it with scissors and adhered it over the first image.

The sentiment from the Critters on the Go set was stamped in VersaMark Ink onto a small black cardstock strip. I heat embossed it with white embossing powder and adhered it to the envelope. Finally, I popped up the image with foam tape.


Thank you so much for stopping by! Have a beautiful day!
Anja

Sunny Studio Stamps • Spring Release • Heart Shaped Dies

20.01.2022

Hello everyone,

today I'm sharing a spring themed card where I used the versatile heart shaped dies from the latest release. I love that the Scalloped Heart Dies and Stitched Heart 2 Dies can be layered together.

First, I covered the card base with one of the Flirty Flowers Papers. I die cut the largest scalloped heart from coral cardstock and the stitched heart from white cardstock. To create the background for my scene, I did some masking and ink blending with Distress Oxide Inks (Tumbled Glass, Mowed Lawn, Shabby Shutters). I layered the hearts on top of each other and adhered them to the center of the card.

Next, I stamped the sweet images from the Bunnyville set in Memento Tuxedo Black Ink and colored them with Copic Markers. I used the coordinating dies to cut them out. The sentiment from the Paris Afternoon set was stamped in VersaMark Ink and heat embossed with Salvaged Patina Distress Embossing Glaze. I fussy cut it out with scissors.

Finally, I adhered the images and sentiment with foam tape. The cute bunny sitting on the carrot just makes me smile.


Thank you so much for stopping by! Have an awesome day!
Anja

Sunny Studio Stamps • Spring Release • Lovey Dovey

13.01.2022

Hi everyone,

the new Spring Release went live last Friday and it is jam-packed with totally adorable stamps and fabulous dies!

For my first card I used the Lovey Dovey set which comes with beautiful large love-themed sentiments. I picked the precious 'I love you to the moon and back' one and created a night scene around it.

First, I started off with the background and trimmed down a piece of white cardstock to a regular A2 size. I used the smallest of the Tim Holtz Moon Masks and created a radiant blend around the circle using Distress Oxide Inks (Salvaged Patina, Prize Ribbon, Chipped Sapphire and Black Soot). I also added the moon texture with the stencil and a light touch of Pumice Stone ink. I let everything dry completely before stamping the sentiment inside the moon with VersaMark Ink. To create a shiny, translucent look I used Salvaged Patina Distress Embossing Glaze to heat emboss the sentiment.

Next, I die cut the Cityscape Border from black cardstock to mimic house silhouettes in the dark of the night. I also hand cut some yellow paper to go behind it for the tiny enlightened windows. For the ground I trimmed down a dark grey cardstock strip and adhered it as well as the cityscape to my ink blended background.

I fell in love with the new Passionate Penguins Stamps the first time I saw them – they are sooo cute! Of course I had to use them on my card ;-) I stamped the penguins in the car with Memento Tuxedo Black Ink and did some Copic coloring. The image was die cut with the coordinating die and popped up using foam tape. Finally, I die cut three little hearts from pink cardstock and covered them with Glossy Accents.


Thank you so much for stopping by! Wishing you a wonderful day!
Anja

Sunny Studio Stamps • Heart Bouquet

30.12.2021

Hello everyone,

hope you spent some wonderful holidays with your loved ones! Now that Christmas is over, it's time to get ready for the upcoming Sunny Studio Spring Release. There's a new mini stamp set called Heart Bouquet which is already available in the store. Haven't created a fun one layer card for ages, so I combined the cutie from the Bear Hugs set with this sweet bunch of balloons.

First, I started off with a top folding A2 card base made from white heavyweight cardstock. I stamped the polar bear in Memento Tuxedo Black Ink onto a white cardstock panel and also created a mask for him. Next, I stamped the heart ballons and ice block. I created some masks for these images as well to cover them while I work on my background.

I masked off the bottom third, to blend the Distress Oxide Inks Dusty Concord, Milled Lavender, Spun Sugar and Tattered Rose together for the sky. I splattered on some ink with a small paint brush. After it was dry, I covered the background and applied Salvaged Patina ink for the water. I also stamped some waves which are included in the My Otter Half set.

It's always a magical moment when you peel off the masks. Now, I colored the images with Copic Markers. I stamped the sentiment in VersaMark Ink and heat embossed it in white. Finally, I cut out my scene with a stitched rectangle die and adhered it to the card base.


Thank you so much for stopping by! Have a lovely day!
Anja

Sunny Studio Stamps • Holiday Release • Christmas Critters

23.12.2021

Hi everyone,

still not done with posting holiday cards, yet ;-) Today, I'm featuring the cute Christmas Critters Stamps.


I started off with an A2 card base made from white cardstock. The gorgeous floral patterned paper is from the All Is Bright 6x6 Paper pack and I cut it out with the stitched rectangle mat die included in the Frilly Frames Retro Petals set. Since the paper is quite busy, I also die cut a white cardstock circle and one of the stitched scalloped Fancy Frames Circles from aqua cardstock.

Next, I stamped the sweet little mouse, deer antlers and wreath in Memento Tuxedo Black Ink and colored them with Copic Markers. I used the coordinating dies to cut out the images and adhered them with foam tape to the center of the framed circle.

The sentiment from the Inside Greetings Holiday set was stamped in VersaMark Ink onto pink cardstock. I heat embossed it with white embossing powder and cut out a banner with one of the Banner Basics Dies. To create the right width, I used partial die cutting. I die cut a white stitched strip with the smallest Slimline Pennant Dies to go behind the sentiment banner which I popped up with foam tape as well.


Thank you so much for stopping by! Merry Christmas to everyone!
Anja

Sunny Studio Stamps • Holiday Release • Bear Hugs

16.12.2021

Hello everyone,

today's featured Bear Hugs stamp set is one of my all time favorites for sure! This time I created a slimline card and used three of the adorable images.


First, I started off with the card base made from lavender cardstock. I trimmed down a piece of gingham paper (Gingham Pastels 6x6 Paper) and matted it with dark purple cardstock.

To create three stitched scalloped frames for my images, I used the Fancy Frames Square Dies and die cut them from white cardstock. I also cut out three white squares to go behind the frames and applied some Salvaged Patina Distress Oxide Ink in the background.

Next, I stamped the bears in Memento Tuxedo Black Ink and colored them with Copic Markers. I cut them out with the coordinating dies and adhered them to the squares.

For the custom sentiment, I cut the delicate 'hugs' word die included in the Scalloped Oval Mat 3 Dies set from silver glitter cardstock. The accompanying sentiments were stamped in VersaMark Ink onto small turquoise cardstock strips and I heat embossed them in white.

Finally, I assembled the card and added a little silver glitter heart above the bears in the middle.


Thank you so much for stopping by! Hope you have an awesome day!
Anja

 
site design by designer blogs