Posts mit dem Label Prismacolor werden angezeigt. Alle Posts anzeigen

Sunny Studio Stamps • Summer Release • Savanna Safari

11.06.2020

Hi everyone,

today I'm sharing a birthday card made with the adorable Savanna Safari Stamps. Of course I had to create a sunset scene.


I started off with a light brown A2 card base and an extra panel from where I cut out a window with the biggest Stitched Semi-Circles Die. For the sunset background, I blended together the Distress Oxide Inks Squeezed Lemonade, Scattered Straw, Wild Honey, Abandoned Coral and Picked Raspberry. The grass was done with Bundled Sage and Mowed Lawn.

Next, I stamped the critters and a couple of leaves (Fabulous Flamingos Stamps) in Memento Tuxedo Black Ink and colored them with Copic Markers. I added details to the lion with Prismacolor pencils and cut out the images with the coordinating dies. The sentiment was stamped in VersaMark Ink onto a black cardstock strip and I heat embossed it with white embossing powder.

I adhered the window panel over the ink blended background with foam tape. I tucked the leaves behind the window and popped up the zebra and toucan as well. To finish off the card, I added two black die-cut hearts.

Thank you so much for stopping by! Hope you're having an amazing day!
Anja

Sunny Studio Stamps • Summer Release • Tea-rrific

14.05.2020

Hi everyone,

today I'm back with a sweet card featuring the Tea-riffic Stamps mini set. And the teacup and teapot are even cuter with the added little faces.


First, I die cut the Botanical Backdrop frame from Bristol cardstock and did some watercoloring with several green Karin Brushmarkers. I also splattered on tiny dots of paint for a bit more interest.

Next, I stamped the images in Memento Tuxedo Black Ink. I colored them with Copic Markers and Prismacolor Pencils. There are coordinating dies available but I fussy cut both images and adhered them with foam tape.

I combined the scripty 'hello' from the Potted Rose set with a punny Tea-riffic sentiment and finished off my card with enamel hearts.


Thank you so much for stopping by! Have a beautiful day!
Anja

SugarPea Designs • Guest Design #2

10.02.2020

Happy Monday!

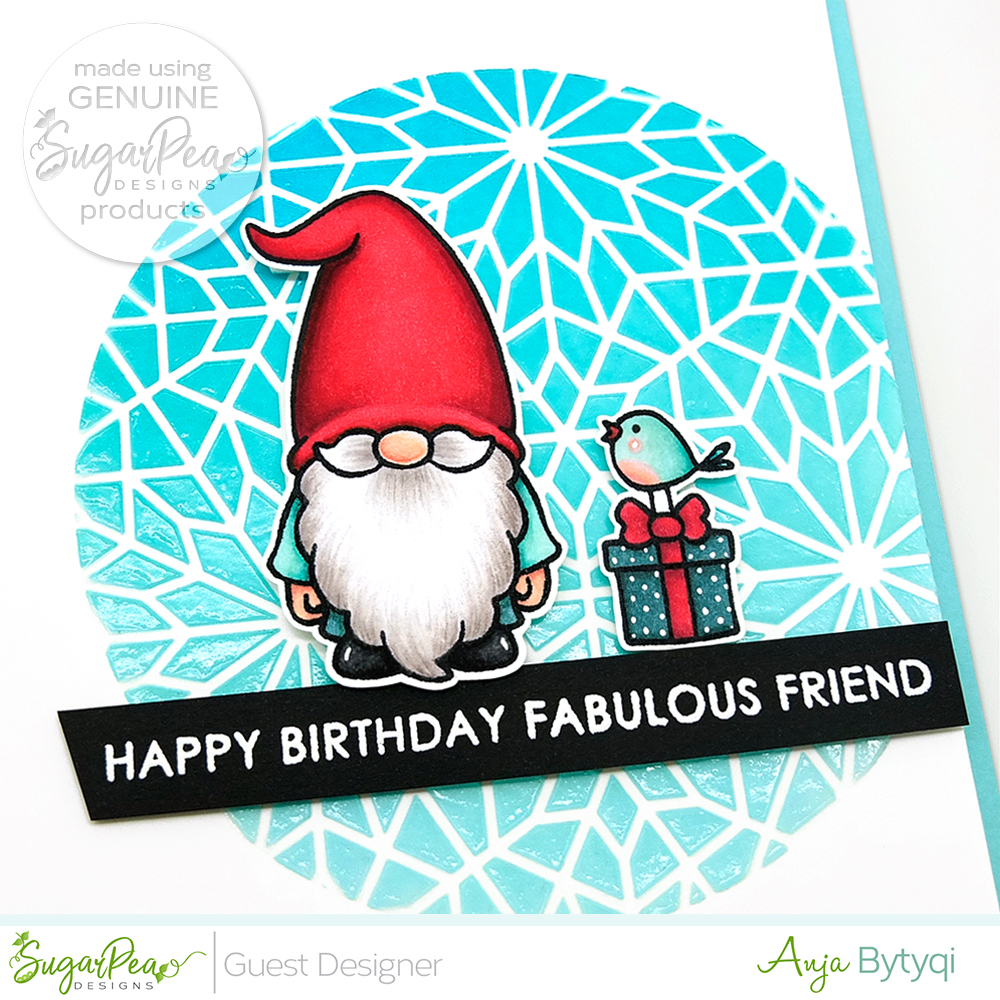
today I'm back with my second post as a guest designer for SugarPea Designs. I fell in love with the adorable Gnome For Christmas set the moment I saw it. You can easily use it for non-holiday projects, too. I came up with this birthday card.

I started off with a turquoise A2 card base and cut a mask from masking paper using a circle die. For my planned partial stenciling, I adhered the negative cut-out over a white cardstock panel. I placed the Geo Snowflake Stencil over the circle opening of my masked off cardstock and secured it with washi tape. I blended the Distress Oxide Inks Tumbled Glass, Peacock Feathers and Mermaid Lagoon through the stencil and let it dry. To add some interest, I carefully applied a thin layer of translucent embossing paste over it. Love the subtle shine and dimension of the stenciled circle.


Next, I stamped one of the gnomes and combined the gift with a little birdie from the Hey Summer set. I colored the images with Copics and fussy cut them out with scissors leaving a small white border. I added white dots with a gelly roll pen and for a bit of texture I used grey Prismacolor pencils on the gnome's beard.

I combined two of the Everyday Sentiments and stamped them onto a black cardstock strip with VersaMark ink. I heat embossed it with white embossing powder. Finally, I popped up the images and sentiment strip with foam tape and adhered the whole design with a piece of fun foam to my card base.

Thank you so much for stopping by! Stay tuned for next week's project!
Anja

SugarPea Designs • Guest Design #1

03.02.2020

Hi crafty friends,

I'm so excited to finally share my happy news! I was invited to be a guest designer for SugarPea Designs and I'm honored to show my projects each Monday this month. I had so much fun creating with their awesome and cute products!


Valentine's Day is just around the corner, so I made a love-themed card combining the Ooh La La stamp set with the SugarCut ParisScape die.

For my sky background, I blended together the Distress Oxide Inks Tattered Rose, Spun Sugar, Picked Raspberry and Seedless Preserves. Next, I die cut the Paris landscape from white cardstock and adhered it at the bottom.

I stamped the adorable croissant with Memento Tuxedo Black ink and colored it with Copics. I enhanced the shading with Prismacolor pencils and used the coordinating die to cut out the image. For some extra shine, I covered the balloons with Glossy Accents.

The sentiment was stamped in VersaMark ink onto a black cardstock banner. I heat embossed it with white embossing powder and adhered the banner as well as the image with foam tape. Finally, I added two little hearts which I die cut with the SugarCut You're My Type dies.


Thank you so much for stopping by! Have an amazing day!
Anja

Sunny Studio Stamps • Winter Release • Feeling Frosty

12.12.2019

Hello everyone,

the Sunny Studio Stamps Feeling Frosty set is one of my favorites and I already used it a couple of times. So I wanted to come up with something different and tried no-line coloring which I find quite intimidating to be honest.

With the help of some masking, I created a one layer scene. I combined the Feeling Frosty snowmen and cups with the hillside border from the Scenic Route set. For a very light stamped color, I used the Inkon3 Fadeout No Line Coloring Detail Ink. I colored the images with Copic Markers and Prismacolor Pencils.

The sky was done by blending Distress Oxide Inks (Milled Lavender and Spun Sugar) and splattering white paint with a brush. I cut one of the Fancy Frames Square Dies from white cardstock to frame my little winter scene.

I think the sentiment is the perfect match for these snowman friends who share a cup of hot cocoa together. It's stamped in VersaMark Ink and heat embossed with Ranger Liquid Platinum Embossing Powder. I die cut a stitched banner and adhered it with foam tape. To finish off my card, I added White Clay Snowflakes and a Pink Clay Heart.

Thank you so much for stopping by! Wishing you a beautiful day!
Anja

Sunny Studio Stamps • Winter Release • Scenic Route

07.11.2019

Hello everyone,

today I'm showcasing the Sunny Studio Stamps Scenic Route Stamps. The row of houses is my favorite stamp in this set and I created a simple monochromatic card.

I stamped the image and the sentiment from the Foxy Christmas set in VersaMark Ink onto a 4 1/8" x 7" piece of aquamarine cardstock. I heat embossed both with white embossing powder.

For a change, I did some coloring with Prismacolor pencils. I added a tiny pink die-cut heart as a little pop of color.


Thank you so much for stopping by! Until next time!
Anja

Hello Bluebird • Background Bash • Day 2

25.07.2019

Hi again,

For Day 2 of the Hello Bluebird Background Bash, I'm sharing a fall-themed card where I used the gorgeous Cozy Plaid Background. And don't forget, that the release of 6 new background stamps will go live tomorrow on Friday, July 26th! The older designs will be restocked, too!

This plaid pattern works just perfect for fall projects and I stamped it with Altenew "Autumn Blaze" dye ink onto cream cardstock. I did a simple card layout by combining the plaid with beautiful wine red cardstock and a strip of navy/white patterned paper.

The adorable critters and autumn leaves are from the Fall Buddies set. I colored the squirrel, pumpkin and mouse with Prismacolor pencils. The leaves were watercolored with ZIG Clean Color Real Brush Pens. I used the coordinating dies to cut everything out. Finally, I stamped the sentiment in VersaFine Onyx Black on a piece of kraft cardstock which I adhered with foam tape.

Thank you so much for stopping by! Have a great evening!
Anja

Hello Bluebird • February Release • Portrait Pals

16.02.2019

Hi peeps,

the fab Hello Bluebird February Release went live yesterday! Today I have this card for you highlighting the awesome Portrait Pals set. I only used three of the six critters that are included in the set and they are so much fun to color!

First, I created a radient sky background by ink blending Distress Oxide Inks (Tumbled Glass, Salty Ocean, Blueprint Sketch) on Strathmore Bristol Smooth Cardstock. Next, I stamped the images with  Memento Tuxedo Black ink and colored them with Copics and Prismacolor Pencils. I used the coordinating dies to cut them out.

The Photo Stack Die which is also part of the new release goes perfectly with these critters. I die cut the frames twice from white cardstock and stacked them together for more sturdiness. The die set also comes with the word "smile" that I cut from an ink blended left-over piece as well as two little hearts (included in the Gallery Frame Die #1).

I white heat embossed one of the new Typed Everyday sentiments on a thin strip of black cardstock. Finally, I assembled my card by tucking the leaves under the photo frames and adhering all the pieces at an angle for some interest.

Thank you so much for stopping by! Have a wonderful weekend!
Anja

Hello Bluebird • Frosty Friends • Let It Snow

11.10.2018

Hello everyone,

only one more day til the new Hello Bluebird October Release will be available! As I did not have the chance to play with the goodies yet, I'm sharing a card with one of my very first Hello Bluebird stamp sets – Frosty Friends.

First, I stamped the Country Gingham Background in «Fog» dye ink onto a piece of «Fog» cardstock (both by Simon Says Stamp). I adhered the panel with fun foam to a top folding card base made from the same cardstock.

For my snowy background, I blended together the two Distress Oxide Inks «Shaded Lilac» and «Tumbled Glass» on some Bristol cardstock. I splattered on white paint to mimic falling snow, let it dry completely and cut it with a circle die. I also added a snow hill cut from white glitter paper.

Next, I colored the adorable snowman and birdie from the Pig Day set with Copics and added details with Prismacolor pencils. I stamped the speech bubble in VersaFine «Onyx Black» and cut out the images with their companion dies.

To complete my winter scene, I cut the Halloween Tree Die from plain white cardstock and adhered it with foam tape as well as the images. I finished off this card by adding Nuvo «White Blizzard» Glitter Drops.

Thank you so much for stopping by! Will be back soon with a 2nd card ;-)
Anja


Hello Bluebird • July Release • Otter Friends

19.07.2018

Hi peeps,

have you shopped the newest Hello Bluebird July Release yet? Today, I would like to introduce you to another sweet set called Otter Friends. I created a little pond scene and let the adorable otters play with fish.

For the background, I did some watercoloring with Distress Oxide Inks. Next, I used the Avery Elle «Oval Burst» die to cut a window from white cardstock. I colored the images with Copics and Prismacolor pencils and used the Otter Friends companion dies to cut them out. This set also includes wave dies so you could tuck something in like I did with the otter.

I white heat embossed the sentiment on a strip of black cardstock and foam mounted it onto the card. Then I arranged the cattails around the oval window and finished off my card with Pretty Pink Posh «Sea Glass» crystals.

Thank you so much for stopping by! Will see you later with a second card.
Anja

Hello Bluebird • Piggy Picnic

31.05.2018

Good morning everyone,

I finally got my hands on the new products from the Hello Bluebird May Release. And what can I say, I just LOVE them all!

I made this card using these adorable pigs from the Farmyard Little Bits stamp set. They are sitting on a polka dot blanket (from the Hippos on Holiday set) enyoing a little cupcake picnic. I did some masking to create my scene. Since I haven't done the No Line Coloring technique for quite a while, I used it for a change. I combined Copics and Prismacolor pencils for details. I tried the new-to-me «Fadeout No Line Coloring» ink by Ink On 3 and I really like it.

In the background, I did some light ink blending using the Tim Holtz Distress Blending Brushes which are great for this. Next, I die cut the My Favorite Things «Snow Globe» shape from «Subtle Plaids» patterned paper. I directly adhered my colored scene to the card base and popped up the plaid window panel with foam tape. The sentiment from the Farmyard Little Bits stamp set was heat embossed in white on a small banner. Finally, I added two die cut clouds (Puddle Play Die) and a small pink heart.

Thank you so much for stopping by! Have a great day!
Anja

MFT Card Design Superstar Contest Coloring Virtuoso

20.09.2017

Good morning everyone,

I made a second card for the ongoing My Favorite Things 2017 Card Design Superstar contest.

https://www.mftstamps.com/blog/you-could-be-a-2017-card-design-superstar/

I'm entering the Coloring Virtuoso category with an one layer card that I colored with Copics and Prismacolor Pencils.


I used four! different Birdie Brown stamp sets to build the entire scene – «Cool Cat», «Our Story», «I Knead You» and «Lucky Dog». I love how perfectly all those images fit together, just as if they were from one set. And I always enjoy coloring them in, too!

This card is pretty much CAS but with a fun little twist because I wanted to tell a story. At first, I stamped and masked all the images. I don't make scenes like this often, so I really had to plan everything in advance. After all the images were protected by hand-cut masks, I sponged some «Insulation Pink» Premium Dye Ink through the «All Lined Up» stencil to create the subtle striped wall background. It's always like magic when you remove the masks :-)

Next, I carefully colored in my scene. I gave the dog's pillow a denim texture and added little details with a white gelly roll pen. The flower vase and the dog's nose are covered with Glossy Accents for some extra shine. I stamped the sentiment in VersaMark ink and heat embossed it with Ranger «Liquid Platinum» embossing powder. To finish off my card, I also put on small Nuvo «Rosewater» Jewel Drops.

Big thanks to MFT for hosting this amazing contest – there are already so many creative and outstanding submissions!

Thank you so much for stopping by! Good luck to everyone!
Anja

MFT Camp Create Day 5: Glitzy Glitter

21.06.2017

Hello again,

so happy that I was able to make a last card for the first session of My Favorite Things Camp Create 2017.


Thank you MFT for hosting this fun and inspiring event! The final craft for Day 5 is Glitzy Glitter.

https://www.mftstamps.com/blog/camp-create-june-16/

Therefore I picked my favorite glitter cardstock and pretty «Metallic Brass Sparkle Embossing Glitter» by WOW!.

At first, I created a little frame element by cutting the glitter cardstock as well as a piece of white foam with one of the «Stitched Square Scallop Frames». I stacked the die-cuts together for a little bit of dimension and trimmed some vellum a tad smaller than my frame. Next, I stamped the sentiment from the «Lucky» set in VersaMark and heat embossed it with the sparkly WOW! glitter.

The flower is actually from my small stash of pre-colored images from the last The Daily Marker 30 Day Challenge hosted by Kathy Racoosin. I masked the floral image and added the leaves before coloring it with Prismacolor Pencils.

For my background I chose a piece of patterned paper from the «Proper Pinstripes 6x6 Paper Pack» and matted it onto purple cardstock. To finish my card, I adhered some sequins with a «Platinum Stickles» dot in the middle.

Yippie! So proud that I managed to collect all 5 badges!


Thank you so much for stopping by! Have a wonderful evening!
Anja

DT Stempelgarten Challenge March

10.03.2017

Hi everyone,

not much crafting going on these days but I recharged my batteries during a few days of vacation.

So finally I'm sharing my card for the current Stempelgarten Challenge with the new theme «Mmm … Yummy!».

http://stempelgartenchallenge.blogspot.ch/

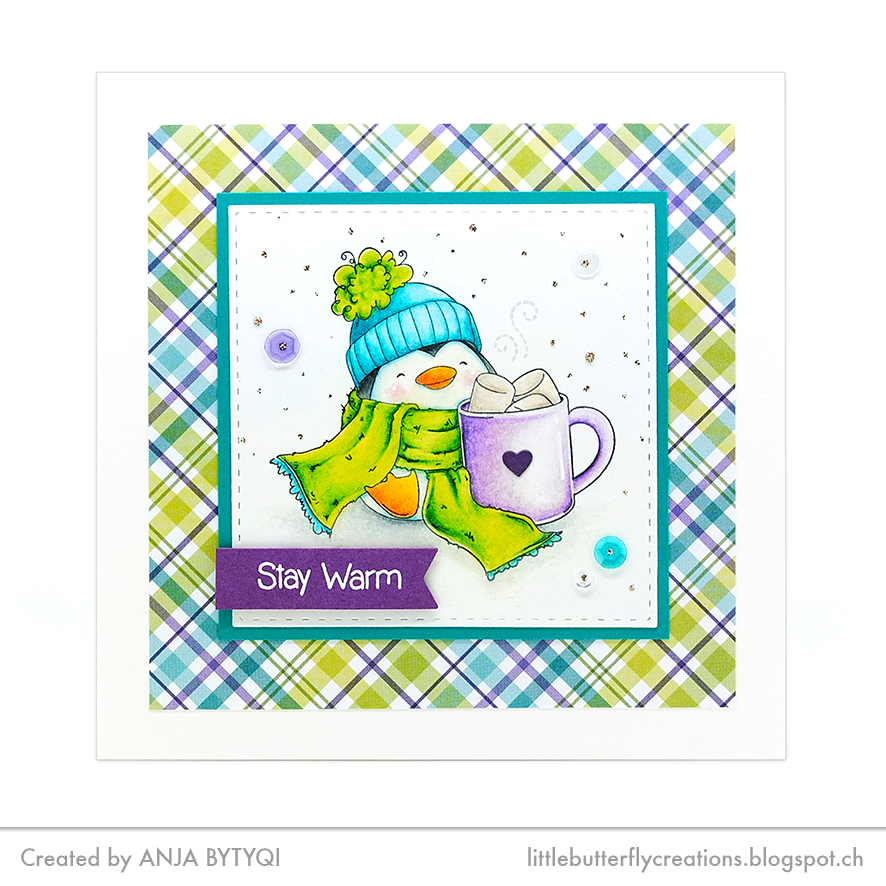
I colored this cute Stamping Bella penguin for Kathy Racoosin's fun The Daily Marker 30 Day coloring challenge using my Prismacolor pencils.

The plaid patterned paper and the white embossed sentiment are from My Favorite Things. To finish my card, I added some random Ranger Stickles «Platinum» dots and sequins from my stash.

You will have time until March 31st, 2017 to join our challenge and this is the prize you could win:


A craft package from the Stempelgarten Online Shop with a value of CHF 20.–.

Thank you so much for stopping by! Good night ;-)
Anja

DT Stempelgarten Challenge January

07.01.2017

Hi crafty friends,

I'm finally back to share a card with you. Hope you've enjoyed the holidays and had a pleasant start into the new year. I myself am slowly trying to get back into the swing of things ;-)

The Stempelgarten Challenge already started two days ago– this month's theme is «No-Line Coloring».

http://stempelgartenchallenge.blogspot.ch/

I'm pretty new to this technique but I often admire other cardmakers using it. For Christmas, I received a big pack of Prismacolor Pencils and I couldn't wait to color with them. Although it's pretty cold outside and we also got some snow, I made this floral more spring-themed card.

I love the look of colored pencils on Kraft cardstock, so I stamped the My Favorite Things «Spring Tulips» (I did some Masking to create the bouquet) in Memento «Desert Sand». I really enjoyed the coloring, although it's not perfect.

Since my mojo was still in holiday mode, I followed the current sketch of the MFT Wednesday Sketch Challenge:

I die cut my colored image with the MFT «Stitched Oval Scallop Edge Frames». For the frame I stacked three layers of cardstock to give it some dimension and then inlaid the oval. The patterned paper is from the MFT «Dots & Stripes Neutral 6x6 Paper Pack» and I adhered it to a light pink card base.

Next, I chose a stitched banner from the «Blueprints 28» Die-namics set and cut it from raspberry colored cardstock. I white heat embossed the sentiment (MFT «Essential Sentiments») and popped up the strip with foam tape. Finally, I added three iridescent sequins.

You will have time until January 31st, 2017 to join our challenge and this is the prize you could win:


A craft package from the Stempelgarten Online Shop with a value of CHF 20.–.

Thank you so much for stopping by! Have a great weekend!
Anja

DT Stempelgarten Challenge October

05.10.2016

Good morning everyone,

today starts the new Stempelgarten Challenge with the theme «Pumpkins and/or Autumn/Fall».

http://stempelgartenchallenge.blogspot.ch/

The Stamping Bella image «Fay Loves Fall» is just perfect for this challenge as it combines both ;-)


I stamped her on Kraft cardstock and did some coloring with Prismacolor Pencils. I really love this look! The small sentiment is from the My Favorite Things «Sweet Safari» stamp set. The polka dot frame was cut using one of the MFT «Single Stitch Line Rectangle Frames» Die-namics. To finish my card, I added some sequins.

You will have time until October 31st, 2016 to join our challenge and this is the prize you could win:


A craft package from the Stempelgarten Online Shop with a value of CHF 20.–.

Thank you so much for stopping by!


Welcome Baby Girl

01.09.2016

Hello peeps,

sorry for not posting regularly but sometimes life gets in the way ;-)

Today I want to share a card with you that I made to welcome a new sweet baby girl.


Over the years, I collected hoarded tons of patterned paper. I really think I should use them more often. The papers and also the tag are from the cute «Little You» collection by Crate Paper. The Stampin' Up! «Basic Gray» cardstock is the perfect match.

While cleaning up my craft room, I found this adorable bunny stamp from TOGA and used Altenew Crisp Dye Ink and Prismacolor Pencils to color it. The sentiments are from the Lawn Fawn «Little Bundle» stamp set. I assembled the card using foam tape for more dimension and also added some sequins.

I'm entering the current Simon Says Stamp Wednesday Anything Goes Challenge.

Thank you so much for stopping by and happy STAMPtember!


DT Make it Crafty CAS Challenge #15 | Hummingbird

16.07.2016

Hello everyone,

today I show you my card for the last Make it Crafty CAS Challenge with the fun theme «Make it move!». All you have to do is create a project that incorporates some form of 'movement'.

I used the beautiful Hummingbird Digi Stamp from the new Elegant Birds Collection. I combined this cutie with the Hibiscus flower which is provided in the same download.


At first, I masked off the hibiscus and blended in some blue ink and let it fade out towards the centre. Then I colored the images with Copics and Prismacolor pencils. It's probably not realistic looking but I love the colors. To create my moving element, I fussy cut the hummingbird and put it on an Action Wobbler. I also added lots of shimmer to the bird with the ZIG Wink of Stella Glitter Brush Pen in Clear.


The sentiment is from the Mama Elephant «Make A Wish» stamp set. I stamped the text with VersaMark ink and heat embossed it using WOW! «Metallic Platinum» embossing powder. I added some Pretty Pink Posh «Sparkling Clear» sequins and my DIY rosy droplets.

Here is a short video to show you the wiggling hummingbird ;-)


There's still time to enter our «Make it move!» challenge by the end of the month. You can find all the details HERE.

Thank you so much for stopping by! Have a wonderful weekend!


Floral Thinking Of You Card

21.06.2016

Hello everyone,

now and then you create a sympathy card for someone who has lost a beloved person. And sometimes you gonna make a card for someone who's still in grief about this loss. Because mourning takes time and everyone is different. So, I like the idea of sending out «Thinking Of You» cards to let them know that I feel for them.

Here is the card that I made recently:


I kept it pretty simple by white heat embossing this beautiful floral image from Studio Calico/Jasmine Jones onto «Pool Party/Aquamarin» cardstock by Stampin' Up!. Then I added some light shading to the blossoms' petals with Prismacolor Pencils in white and aqua. I stamped the sentiment (from the German SU set «Malerische Grüsse» which means «I'm thinking of you») with VersaFine «Onyx Black».

I die-cut my panel with the My Favorite Things «Inside & Out Stitched Rounded Rectangle STAX» Die-namics and popped up the outside piece with foam tape. I think this almost looks like a frame.

Thank you so much for stopping by!


DT Make it Crafty CAS Inspiration | Cherry Blossom

29.02.2016

Hi peeps,

although it's still winter here, I'm already in a spring mood. That's why I decided to print out and color this beautiful Cherry Blossom Digi Stamp as this month's inspiration for the Make it Crafty Store Blog.


I haven't used my Prismacolor Pencils for a long time and I chose them because I really love how they look on Kraft cardstock. These cherry blossoms are colored in pink like the Japanese ones. Here in Europe they are much more pale in color but I like the contrast to the neutral background.

I die-cut my panel using the largest Simon Says Stamp «Stitched Rectangle» die and matted it on a piece of light pink cardstock which is slighty taller. The top-folding card base is made from Kraft cardtock, too. The German sentiment (which means «Get well») was white heat embossed on a strip of dark brown cardstock which I cut into a banner on the left side. I adhered it with foam tape and added matching pearls to my card.

Thank you so much for stopping by! See you tomorrow.


site design by designer blogs